


Let me guess how your last GPU deployment went …
You opened the cloud console, clicked through a dozen screens, created a node pool, tweaked a few settings... and it worked! Until a month later, when you had to do it again and couldn't remember half of what you'd done. Or worse, when you forgot to tear it down and the GPU bill showed up (exactly what happened to us 1 week ago …)
That's the problem Infrastructure as Code (IaC) solves. And today, for the first time, I'm sharing community-written Terraform code in this newsletter!!
Bruno Copa took our Production OCR Course repo and brought Terraform into it. The whole infrastructure now lives in code: versioned, reviewable, and ready to spin up (or tear down) with a single command. You can check out his implementation here.
It felt like the perfect moment to deliver something I've wanted in this newsletter for a long time: our first Terraform guide for AI Engineers!
Never lose a guide like this again!!
Next week we're launching our new course: We're building a Substack Brain!
Every guide from The Neural Maze (this Terraform one included!) turned into a living knowledge graph you can plug straight into your harness.
No more digging through the archive for that one article you half remember. Just ask Claude Code, Cursor, or Codex, and your agent will have all of The Neural Maze's knowledge at hand.

So, time to introduce the author of this guide! My dear readers … meet Bruno!
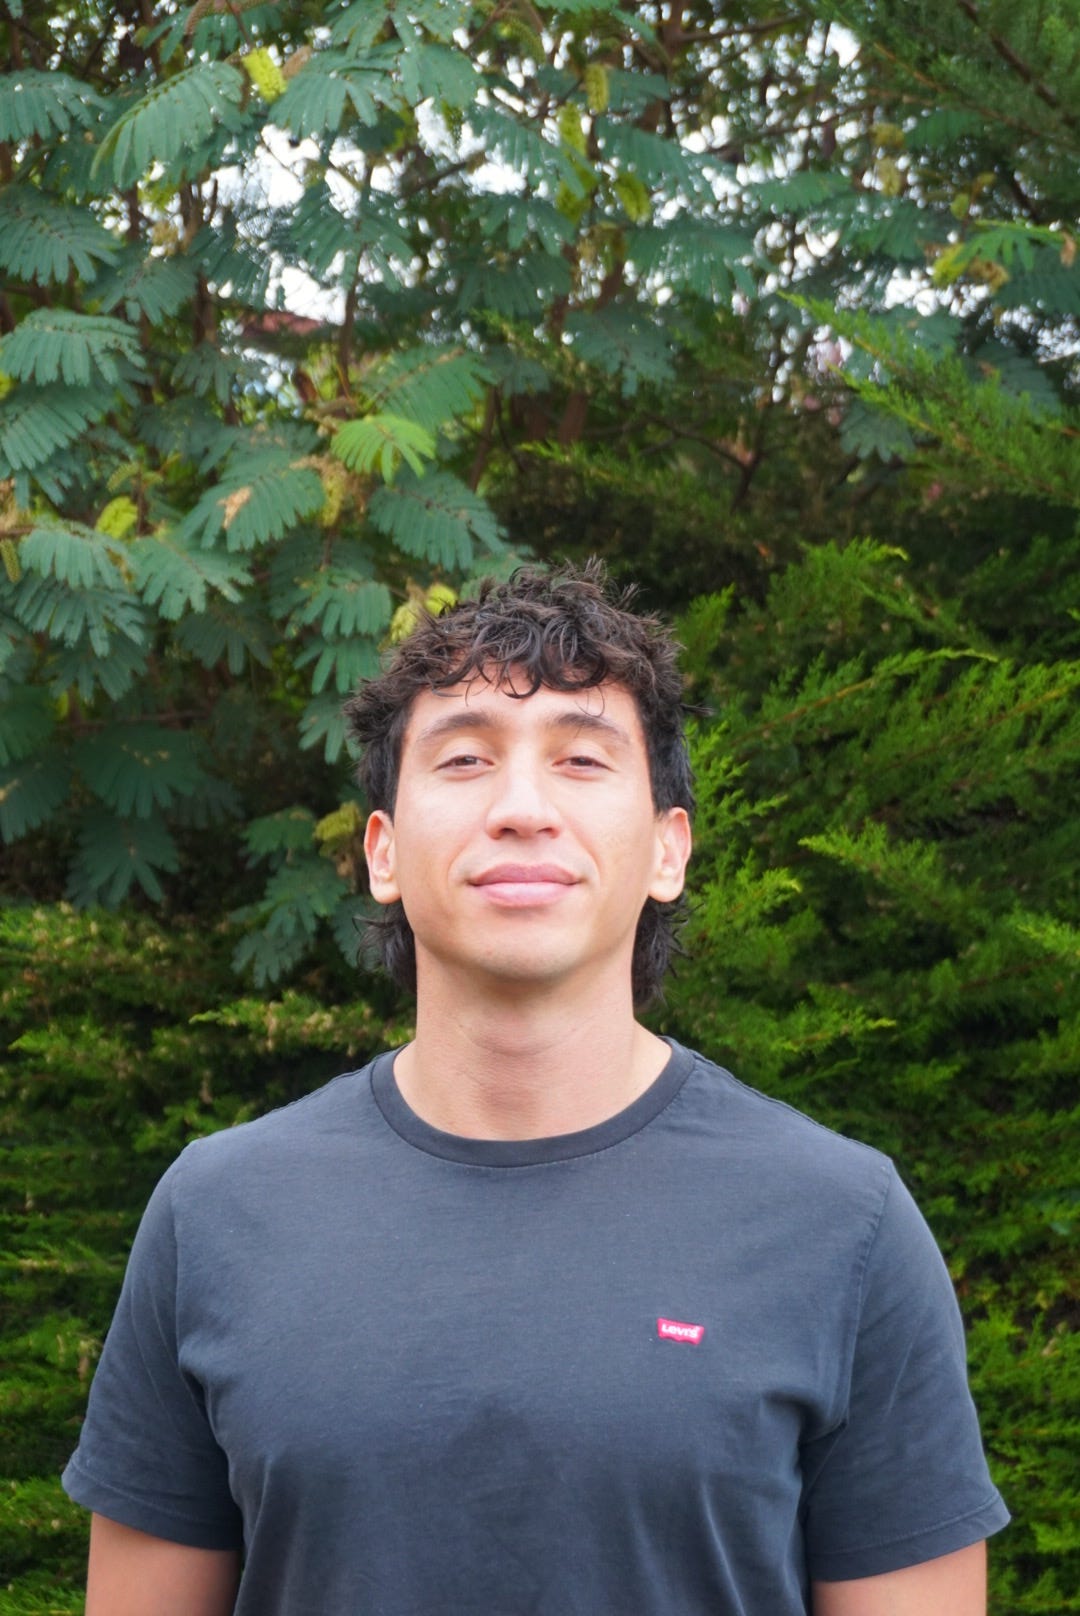
He's the founder of Mirai Engineering, where he's spent the years since the LLM boom focused on one thing: getting deep learning out of Jupyter Notebooks and into production.
And he doesn't just write about it, he ships it. His team builds real products like Applai, which tailors your CV to every job description, and Nutrition Mate, a calorie tracker powered by a fine-tuned small language model that runs right on your phone.
What I love most about Bruno is his take on AI and learning. He's been writing about how to use coding agents without letting them think for you, because, as he puts it, the agents aren't the threat, using them the wrong way is. You'll feel that mindset in this guide: it's not about copy-pasting Terraform, it's about understanding what you're deploying.
So when he wanted to power Applai with an open-source model, he got his hands dirty with GPUs, vLLM, and IaC.
That hands-on experience is EXACTLY what you'll find below.
So Bruno, we are all ears! 👇
What is Infrastructure as Code ?
There's a very clean reason Miguel's OCR course is a good example of why Infrastructure as Code exists.
The project uses Azure as the main deployment path, offers GCP as an alternative, and leaves AWS as the challenge. Same architecture, same goal… but suddenly, you're dealing with three different account models, CLIs, cloud UIs, quota systems, GPU names, regions, and cluster workflows.
And that's where things get annoying fast!
You create an account. Install az. Register the compute provider. Request GPU quota. Pick a region. Create the Kubernetes cluster. Add a T4 node pool. Add the A100 pool. Configure autoscaling.
And now I want you to be honest with me (or yourself) for a second. How long / hard was it to click your way through Azure's cloud UI to find the buttons to do all of the above? 👀
It took probably a little while … So now, let me ask you:
Can you reproduce exactly the same infrastructure tomorrow, without guidance of the tutorial?
Or give it to me so I can deploy it? Or deploy another copy in a different region? Or tell me exactly what changed between last Tuesday and today?
This is where clicking around a cloud console starts becoming painful.
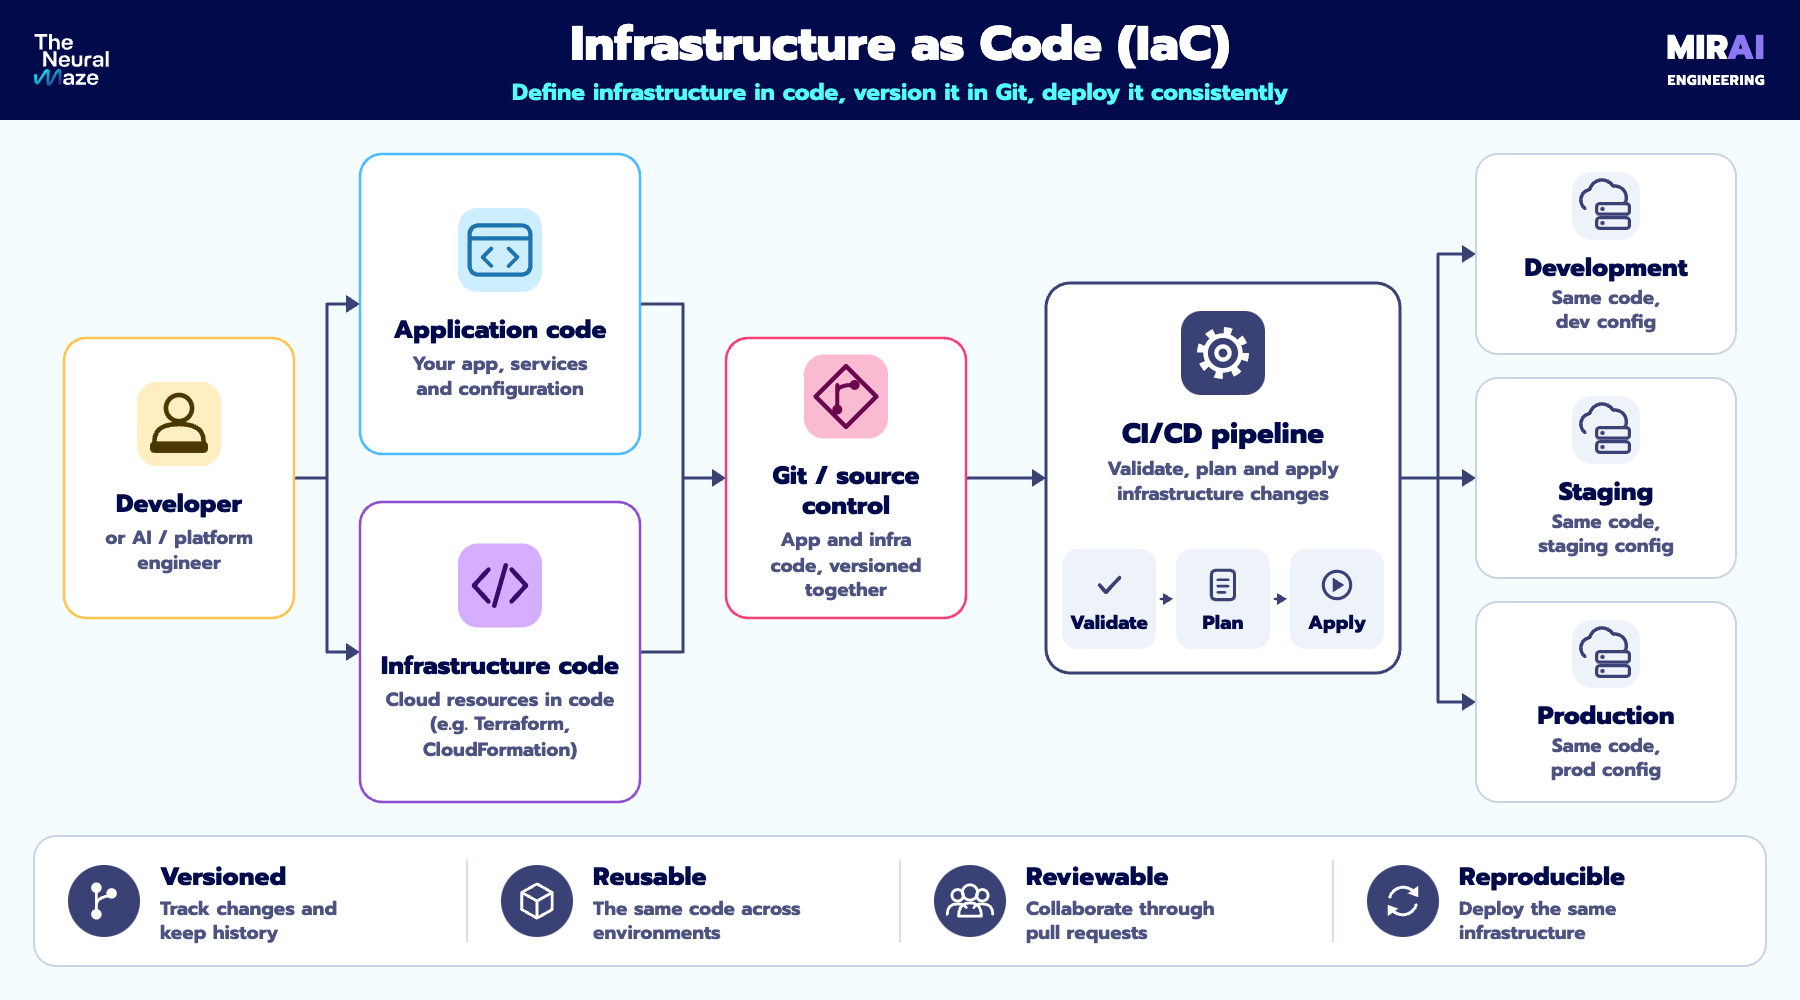
IaC means describing the infrastructure you want as code, instead of manually creating it step by step.
Instead of:
Open Azure → Kubernetes → Create cluster → choose region → configure node pool → select VM → enable autoscaling → ...
we describe something closer to:
I want:
one Kubernetes cluster
on e light GPU node pool
one heavy GPU node pool
autoscaling enabled
these machine types
this networking configuration
…and let software turn that desired state into actual cloud resources.
The important word here is desired.
IaC is usually declarative. We tell the tool what the infrastructure should look like, not every individual API call required to get there. And that gives us something extremely valuable:
Our infrastructure becomes software!
We can put it in Git. Review it. Version it. Reproduce it. Destroy it. Rebuild it.
I highlighted the word "destroy" in the previous sentence. That is of utter importance, especially when running expensive GPUs. IaC (Terraform in this case) allows you to destroy and re-deploy the cluster with a single cli command whenever you're done for the day, and whenever you want to continue with the course. Trust me, your wallet will thank you later.
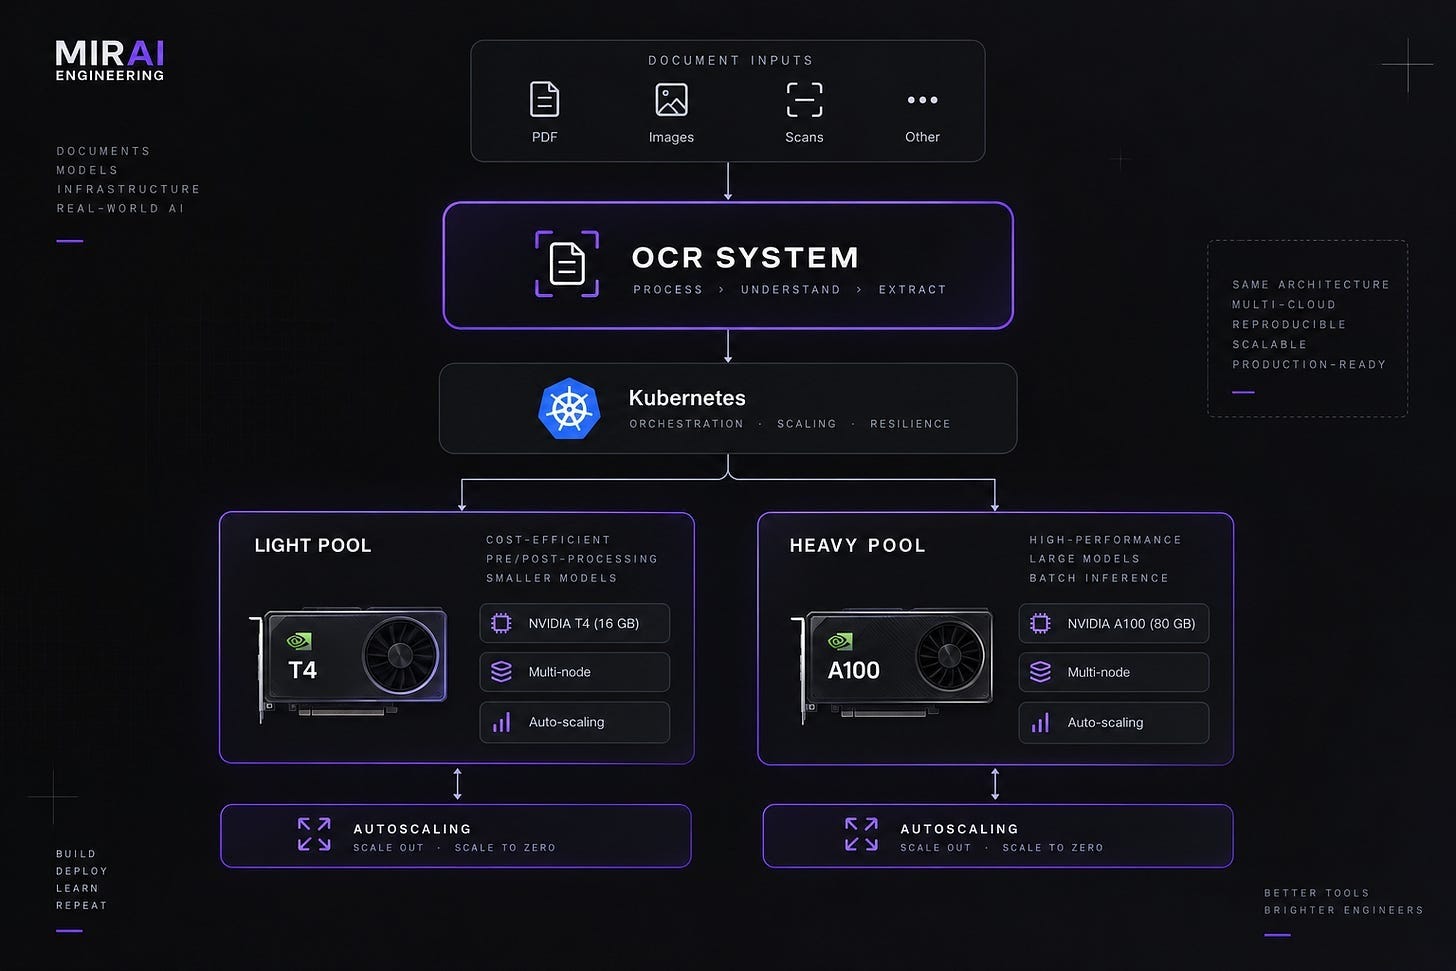
Additionally, Miguel's OCR architecture deliberately separates lightweight GPU workers from the expensive inference pool: cheaper T4-class GPUs handle lighter work while A100s handle the heavy model-serving workload. The system then adds Kubernetes, autoscaling and scale-to-zero on top.
That’s quite a bit more infrastructure than:
python app.py
And precisely the kind of infrastructure I don't want to reconstruct from memory six months from now.
IaC does't magically make cloud complexity disappear
This is important. Miguel spends an entire bonus week getting the cloud accounts ready for a reason.
IaC still requires for you to get familiar with your cloud providers' resources, so that you can truly squish out every bit of power out of it.
More over, cloud providers can't summon an A100 that Azure/GCP/AWS don’t have currently available. Sometimes we have to play with the region a little bit before getting the cluster created.
All of this to say, that IaC gives us a repeatable way of describing and managing everything once the provider lets us have it.
Meet Terraform
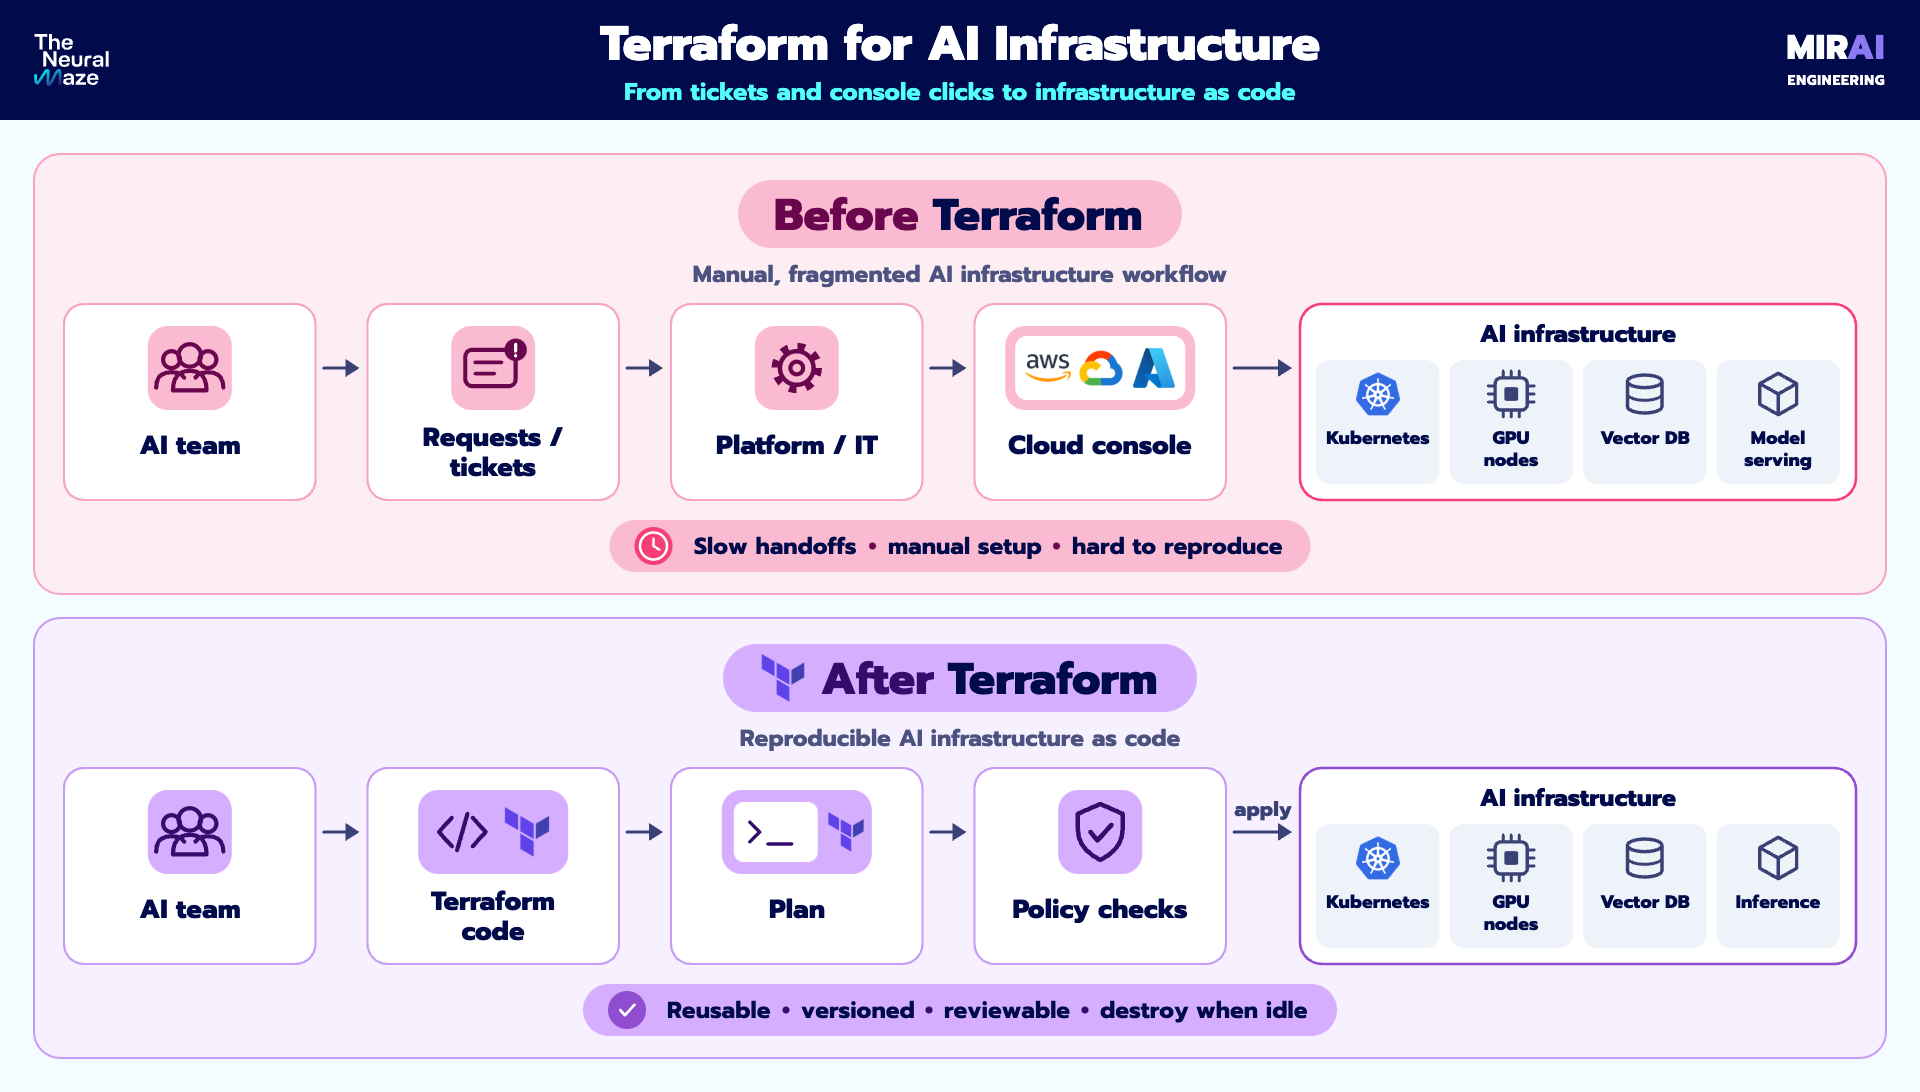
And this is where Terraform enters the story. A tiny bit of Terraform history:
HashiCorp released Terraform as open source in 2014. It grew into the de facto IaC standard and built a huge provider ecosystem around AWS, Azure, GCP, Kubernetes and much more. In 2023 HashiCorp changed Terraform from the MPL open-source license to the Business Source License. That change eventually led to OpenTofu, an open-source Terraform fork now under the Linux Foundation. You can read more here: HashiCorp | An IBM Company
For what we're doing here, the Terraform workflow and ecosystem are what matter. Terraform appeared in 2014 and became probably the best-known Infrastructure-as-Code tool for one major reason:
PROVIDERS!
Instead of creating a completely different infrastructure workflow for every platform, Terraform gives us one language and one lifecycle while providers translate our configuration into calls to Azure, Google Cloud, AWS, Kubernetes and thousands of other APIs.
Then, the workflow on the terminal (for 80% of the cases) is beautifully boring:
terraform init
terraform plan
terraform applyinitdownloads the providers we need.planasks: what would have to change to make reality look like my code?applyactually makes those changes.
Tha's basically the mental model.
And Miguel's OCR project is a perfect example of why this becomes useful.
Again, the original course is built on Azure. There is also a GCP implementation in the repository. And Miguel challenges readers to port the same architecture to AWS.
Without IaC, you quickly end up learning:
Azure Portal + az

        ↓

Google Cloud Console + gcloud

        ↓

AWS Console + aws
All to express approximately the same architectural intention:
Now, Terraform doesn't make Azure, GCP and AWS identical. That's an important distinction.
An Azure GPU VM is still not a GCP GPU VM. Regions differ. SKU names differ. Networking differs. Quotas differ. The actual Terraform resources differ too.
Terraform gives us one workflow, not one universal cloud API.
And that's already incredibly useful. Instead of the infrastructure living inside three different web consoles, it can now live next to the project:
infra/
├── azure/
├── gcp/
└── aws/
Now I can compare architectures in code. I can change the GPU, change the node count, change the region, etc.
I can just run: terraform plan
…and inspect exactly what will happen before I spend a cent. And… since we already used some Terraform commands, this leads me to:
Terraform in 5 minutes
This is not a deep dive. Just enough so that when you see a folder full of .tf files, terraform.tfvars, and commands like plan and apply, you don't blindly copy-paste them and pray.
A Terraform project is basically a description of the infrastructure we want.
I'm going to spoiler you a bit and show you how the infra in production looks like:
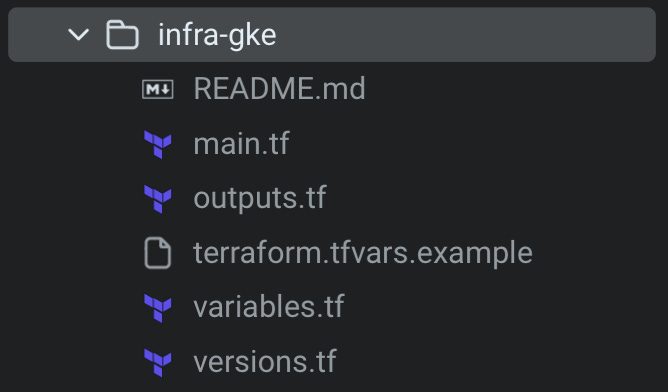
Keep these file names in mind for the next 2 mins, as it's important for you to know when I talk about a file vs. a variable inside a file.
Terraform calls that a configuration. By default, it loads all files ending in .tf inside the current working directory and treats them together as one configuration. So main.tf, variables.tf, outputs.tf, etc. are mostly a convenient way for us humans to organize things; Terraform reads them together.
A tiny GCP configuration could look something like:
terraform {

  required_providers {

    google = {

      source = "hashicorp/google"

    }

  }

}

provider "google" {

  project = var.project_id

  region  = var.region

}

resource "google_compute_network" "network" {

  name = "ocr-network"

}
There are three important things happening here.
1. Providers connect Terraform to the outside world
Terraform itself doesn't know how to create a GKE cluster, an AWS EC2 instance, or an Azure GPU VM. That knowledge comes from providers.
required_providers {

  google = {

    source = "hashicorp/google"

  }

}
The Google provider is basically the bridge between Terraform and Google Cloud's APIs.
When we later describe a GKE cluster, VPC, node pool or Artifact Registry, the provider knows how to translate that Terraform configuration into the corresponding operations on GCP. HashiCorp describes providers as "plugins" that Terraform uses to create and manage resources.
This is also why
terraform initcomes first.
init looks at the configuration, downloads the providers it needs and prepares the directory. Terraform also creates a .terraform.lock.hcl file so subsequent runs can use consistent provider versions.
2. Resources are the actual things we want
The next building block is a resource:
resource "google_compute_network" "network" {

  name = "ocr-network"

}
The first part, google_compute_network, tells Terraform what kind of resource this is. The second, network, is Terraform's local label for that resource. The name = "ocr-network" field is the actual name that will appear in Google Cloud.
A resource can be a network, VM, Kubernetes cluster, GPU node pool, container registry, IAM binding, storage volume, etc. In Miguel's OCR infrastructure, we're going to have quite a few of these. Remember the architecture from before?
           OCR SYSTEM
                 │
            Kubernetes
                 │
      ┌──────────┴──────────┐
      │                     │
  LIGHT POOL            HEAVY POOL
     T4                    A100
Terraform is simply going to describe those cloud components as resources.
3. Variables let us change the deployment without rewriting it
Hard-coding this everywhere would be annoying: region = "europe-west4". Especially if tomorrow I want to deploy the same architecture somewhere else. So Terraform gives us input variables:
variable "region" {

  type = string

}
which we can then use as region = var.region, and put the actual values into terraform.tfvars. For example:
project_id = "my-gcp-project"
region     = "europe-west4"
zone       = "europe-west4-a"
gpu_max_nodes = 4
Terraform automatically loads terraform.tfvars, which is exactly why later in this tutorial we will copy cp terraform.tfvars.example terraform.tfvars and edit it for our GCP project instead of changing the actual infrastructure code. One important note: .tfvars files can contain sensitive information depending on the project. Don’t blindly commit secrets to Git.
But how does Terraform know what already exists?
This is probably the most important piece to understand. Terraform keeps state. After an apply, Terraform records information about the infrastructure it manages in a state file, normally terraform.tfstate.
Think of it as Terraform’s memory. Our code says:
I want an OCR GKE cluster.
Google Cloud contains:
Here is an actual GKE cluster with this ID, configuration, IPs, node pools, etc.
And the Terraform state connects the two.
Terraform stores resource IDs and properties there so it knows which real cloud resources correspond to the things described in our code. HashiCorp explicitly warns that state can also contain sensitive information, so production setups usually store it in a secure remote backend rather than casually passing a local terraform.tfstate file around.
For our mental model, you can think of Terraform as continuously dealing with three things:
YOUR CODE desired infrastructure

          │
          ▼
TERRAFORM + state file

          │
          ▼

ACTUAL CLOUD infrastructure
When we run terraform plan Terraform figures out what actions would be required to get the managed infrastructure from its current situation to what our configuration describes. So if our code says "4 max A100 nodes" and we change it to “2 max A100 nodes” plan shows us what Terraform intends to change before it touches anything.
Inputs go in, outputs come out
Variables let us pass information into Terraform. Outputs do the opposite.
For example, after creating our infrastructure we might want Terraform to give us something useful back:
output "cluster_name" {

  value = google_container_cluster.ocr.name

}
We can then retrieve it with: terraform output .
Outputs are meant to expose useful values from all the hundreds of attributes Terraform may be tracking. You'll see this immediately in our deployment because the repo exposes the command required to authenticate to the freshly created GKE cluster:
terraform output -raw get_credentials_command
So Terraform doesn't just create infrastructure. It can also pass the useful information about that infrastructure to whatever comes next.
And finally: the lifecycle
So now the commands from earlier should make a little more sense:
terraform init
terraform validate
terraform plan
terraform apply
init prepares the project and downloads the providers.
validate checks that the configuration is syntactically valid and internally consistent.
plan shows the changes Terraform intends to make.
apply executes them.
And when we're done: terraform destroy
Terraform uses its state to identify the infrastructure it manages, generates a destruction plan, asks for confirmation, and removes those resources in dependency order.
For a toy VM, that's convenient.
For an OCR cluster with A100s attached, that's the command that might save you from opening your GCP bill tomorrow morning and ruining your breakfast. If you're working for OpenAI, don't do this, otherwise no one will be able to use ChatGPT tomorrow (or maybe you should? 😈).
So now we are ready to go! or… are we?
Before Terraform can deploy our cluster, we need to answer a much more expensive question:
Which GPU should we actually deploy?
Choosing the right GPU for the right model
Luckily, Miguel already did most of the painful part for us (and after this, I will show you the code, pinky promise 🫰). Before Terraform can create our cluster, we need to know what we’re actually asking it to create.
I like to have a feeling of what I need beforehand. And I always run into the same problem when deploying oss-models, no matter the application:
How big of a GPU do I need for the model I'm intending to use?
I haven't really found a nice table mapping model size to GPU size, so I've created my own (plus the extra room that you need for KV caching, CUDA context, etc.).
And personally I'm tired of all the gen-ai-generated marketing/content, so I see myself using more and more old-school vintage tools for some of my applications. So don't be surprised of my 2000s-like looking table :)
Miguel already did most of that work for us. In the course, the architecture separates the workload across two GPU pools: cheaper T4s for the lighter document-processing work, and A100s for the heavy generative inference served through vLLM.
For the Unlimited-OCR deployment, the model is a Baidu 3B parameters in BF16, and it’s size is very roughly:
So you might look at that and think:
Why on earth are we deploying an 80 GB A100?
Because weights are only the starting point.
During inference we also need memory for the KV cache, activations, image inputs, CUDA/runtime overhead and, most importantly here, enough headroom to serve multiple requests efficiently. Unlimited-OCR also supports a 32K context, and the course is building a production vLLM service rather than running one document at a time on someone's laptop. Additionally, VLM generation is heavy. Very heavy.
In other words:
"Can the model fit?" and "What GPU should serve this workload?" are two very different questions.
If you want a quick sanity check before provisioning anything expensive, tools such as the ApX VRAM Calculator can give you a rough first estimate. But workload, concurrency and latency requirements still decide the final hardware.
Ok, enough with the intro. Now we can finally turn it into code.
Pinky promise fulfilled 🫰
Deploying a GCP cluster with Terraform
In this section I will basically explain what happens in README.md. I will show some failure modes that might pop up, and things to pay attention to. That being said, let’s start.
1. Install the local tools
You should have most of this tools installed if you've completed Miguel's course. You might skip some of these if you already know what they do.
macOS (Homebrew)
brew update
brew install --cask gcloud-cli docker
brew install terraform kubectl helm
The gcloud-cli cask installs the Google Cloud CLI distribution, including gcloud, gsutil, and bq. Start Docker Desktop once after installation. If kubectl later reports that the GKE auth plugin is missing, install it with:
gcloud components install gke-gcloud-auth-plugin
export USE_GKE_GCLOUD_AUTH_PLUGIN=True
Linux
Install the Google Cloud CLI using Google's package instructions: https://cloud.google.com/sdk/docs/install-sdk.
Then install Terraform, kubectl, Helm, and Docker from their official package repositories:
Install the GKE auth plugin if it was not included:
gcloud components install gke-gcloud-auth-plugin
Verify all tools before continuing:
gcloud version
terraform version
kubectl version --client
helm version
docker version
2. Prepare Google Cloud before running Terraform
Terraform can create the network, registry, GKE cluster and node pools, but it obviously does not create your Google Cloud account, billing account or project. Miguel already explained all of this here, so I’ll briefly go through getting your google cloud account up and running:
Create an account at https://cloud.google.com/free.
Create a project in the Cloud Console and record its immutable project ID.
Link a billing account and activate/upgrade the account out of Free Trial. You must also activate the full billing account before requesting GPUs. Google keeps any remaining trial credit, but GPU quota is generally unavailable to trial-only projects. Hence new paid projects may still be refused GPU quota as an anti-fraud measure. For this deployment, request regional quota for 4 NVIDIA T4 GPUs and 4 NVIDIA A100 80 GB GPUs.
Also remember that free credit is not a hard spending limit. A good practice is to configure budget alerts before provisioning anything expensive.
Also ensure your identity can enable project services and create VPC, IAM, Artifact Registry, GKE, and Filestore resources. Project Owner is sufficient for a personal course project; organizations should grant narrower administrative roles.
Alternatively, create and link the project with the Google Cloud CLI, instead of clicking around through the UI:
export PROJECT_ID="your-globally-unique-project-id"

export BILLING_ACCOUNT_ID="XXXXXX-XXXXXX-XXXXXX"

gcloud projects create "$PROJECT_ID” --name=”SLM OCR Course"

gcloud billing accounts list

gcloud billing projects link "$PROJECT_ID" --billing-account="$BILLING_ACCOUNT_ID"

gcloud billing projects describe "$PROJECT_ID"
A project has both a display name and an immutable project ID. Terraform needs the project ID, not the display name.
If you have already created some google cloud projects, creating the project with gcloud may initially create the project under "All" rather than "Recent" in the Google Cloud project selector. You can double check with:
gcloud projects describe "$PROJECT_ID"
3. Configure the deployment
From the repository root:
cd infra-gke
cp terraform.tfvars.example terraform.tfvars
Then edit terraform.tfvars:
project_id = "your-gcp-project-id"
region = "europe-west4"
zone = "europe-west4-a"
cluster_name = "gke-ocr-cluster"
artifact_registry_repository = "ocr-repository"
gpu_max_nodes = 4
artifact_registry_repository names the Google Artifact Registry repository that will hold the built container images:
europe-west4-docker.pkg.dev/<PROJECT_ID>/ocr-repository/ocr-vlm-qwen:latestIt could be called production-ocr-course, but it does not need to match the Git repository's name. The selected zone must offer both T4 and A100 80 GB accelerators. You can inspect accelerator offerings with:
gcloud compute accelerator-types list \

  --filter="zone ~ europe-west4 AND (name=nvidia-tesla-t4 OR name=nvidia-a100-80gb)" \

  --format="table(name,zone)"
Again, appearing in this list means the accelerator is supported, not necessarily available at this exact moment.
4. Review before applying
Since you’re now Terraform pro’s after reading my "Terraform in 5 minutes" these commands will be no surprise to you 😉. The README.md shows the commands together for convenience, but I recommend running them one by one the first time, and read the outputs thoroughly:
terraform init
This downloads the Google provider and initializes the module.
terraform validate
This checks that the Terraform configuration is internally valid.
terraform plan -out=tfplan
This is the important review step. Read the plan and confirm the region, zone, machine types and node counts before spending money.
Finally:
terraform apply tfplan
Terraform creates:
a dedicated VPC and subnet;
an Artifact Registry repository;
a zonal GKE Standard cluster;
a system CPU pool;
dedicated Redis and API CPU pools;
a T4 worker pool;
an A100 80 GB inference pool;
Filestore CSI support;
managed identities and IAM permissions.
The GPU pools use a minimum node count of zero:
autoscaling {

  min_node_count = 0
  max_node_count = 4

}
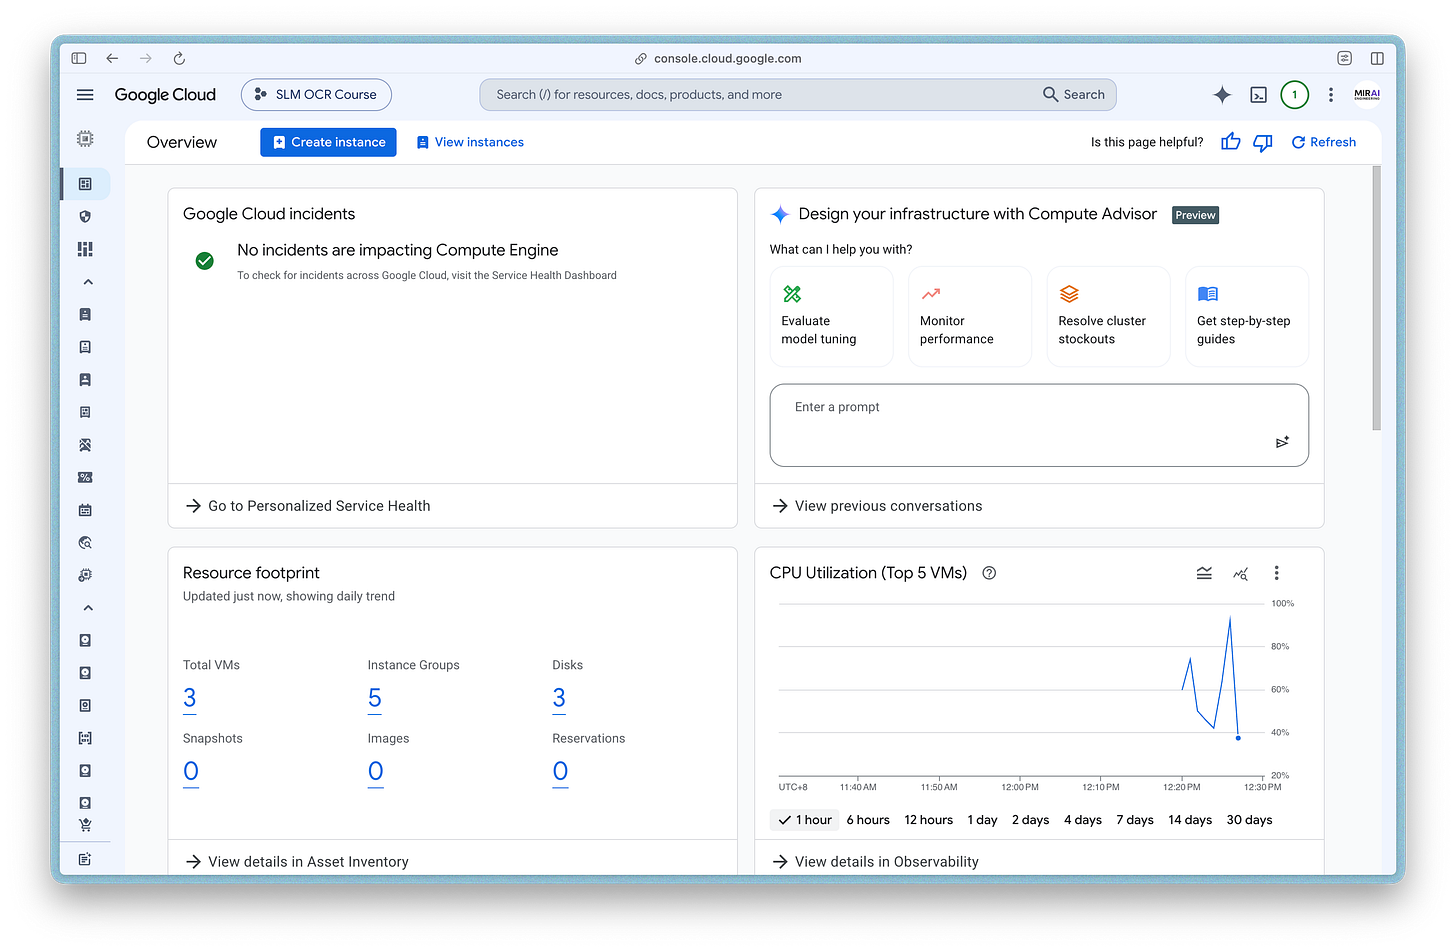
That means terraform apply creates the node-pool definitions, but it does not immediately allocate eight expensive GPUs. A matching Kubernetes Pod triggers the cluster autoscaler when GPU capacity is actually needed. Once finished, your google cloud console should look like this:
5. Connect to the cluster
Terraform exposes the exact authentication command as an output:
eval "$(terraform output -raw get_credentials_command)"

kubectl cluster-info

kubectl get nodes -L cloud.google.com/gke-nodepool,app,workload

kubectl get storageclass standard-rwx
At first, you should only see the system, Redis and API nodes. The T4 and A100 pools remain at zero until requested. GKE also manages the NVIDIA drivers and Kubernetes device plugin for us. We should not install the NVIDIA GPU Operator used by the Azure deployment.
6. Smoke-test GPU capacity
The README includes a smoke_gpu helper that creates a temporary Pod, requests one GPU and runs nvidia-smi:
smoke_gpu gpunpt4
smoke_gpu gpunpa100
The expected sequence is:
Pod created → Cluster autoscaler notices the unschedulable Pod → GPU node pool scales from 0 to 1 → GKE installs and exposes the managed NVIDIA driver → nvidia-smi runs successfully → Temporary Pod is deleted
This can take several minutes. However, waiting does not always mean things are working. Open another terminal and inspect the Pod:
kubectl describe pod gpu-smoke-gpunpt4
kubectl get events --sort-by=.lastTimestamp | tail -50
You may see:
TriggeredScaleUp: gpunpt4 0 -> 1
followed by:
FailedScaleUp: GCE out of resources
That is not a Terraform or Kubernetes configuration error. It means the autoscaler correctly requested a T4, but Google currently has no free T4 capacity in that zone.
Cancel the waiting command with Ctrl+C, then clean up:
kubectl delete pod gpu-smoke-gpunpt4
You can retry later or recreate the cluster in another zone. Be especially careful with the A100 test: once an A100 node boots, billing begins.
7. Build the application images
Terraform creates an empty container registry. The next step builds the application images from this repository and pushes them there:
cd ..
export REGISTRY="$(cd infra-gke && terraform output -raw artifact_registry)"
gcloud auth configure-docker "${REGISTRY%%/*}"
Then build and push:
docker build --platform linux/amd64 \

  -t "$REGISTRY/ocr-vlm-qwen:latest" ./server

docker push "$REGISTRY/ocr-vlm-qwen:latest"


docker build --platform linux/amd64 \

  -t "$REGISTRY/ocr-api-rust:latest" ./client_rt_producer

docker push "$REGISTRY/ocr-api-rust:latest"


docker build --platform linux/amd64 \

  -t "$REGISTRY/ocr-worker-rt:latest" ./client_rt_consumer

docker push "$REGISTRY/ocr-worker-rt:latest"
These images come from three local Dockerfiles:
server/Dockerfileextends the official vLLM image;client_rt_producer/Dockerfilecompiles the Rust API;client_rt_consumer/Dockerfileextends NVIDIA CUDA and installs the OCR worker dependencies.
The --platform linux/amd64 argument matters when building on Apple Silicon because the selected GKE machines use x86-64 processors. The model weights are not embedded in these images.
Keeping large weights outside application images makes rebuilding and updating the software much faster. We deploy the model via
.yamlmanifests instead.
8. Install cluster add-ons & download the model weights
The weights are downloaded separately into a shared Filestore-backed volume:
helm repo add kedacore https://kedacore.github.io/charts

helm repo add prometheus-community https://prometheus-community.github.io/helm-charts

helm repo update

helm upgrade --install keda kedacore/keda \

  --namespace keda --create-namespace --wait

helm upgrade --install prometheus prometheus-community/kube-prometheus-stack \

  --namespace monitoring --create-namespace \

  --set prometheus.prometheusSpec.serviceMonitorSelectorNilUsesHelmValues=false \

  --set grafana.enabled=true \

  --wait --timeout 15m

kubectl apply -f k8s/gke/infra/provisioning/pvc.yaml

kubectl wait pvc/model-weights-pvc --for=jsonpath=’{.status.phase}’=Bound --timeout=30m

kubectl apply -f k8s/gke/infra/provisioning/ingest-job.yaml

kubectl wait pod -l job-name=model-weight-ingest --for=condition=Ready --timeout=15m

kubectl logs -f job/model-weight-ingest

kubectl wait job/model-weight-ingest --for=condition=complete --timeout=60m

kubectl delete job model-weight-ingest
The Job downloads:
PaddlePaddle/PP-DocLayoutV3_safetensorsQwen/Qwen3.5-4B
Deleting the completed Job does not delete the models. They remain on model-weights-pvc, ready to be mounted by the T4 workers and A100 inference Pods.
There is an important cost implication here: the PVC provisions a 1 TiB Filestore instance. GPU pools can scale to zero, but Filestore continues billing until the PVC and its underlying cloud resource are deleted.
9. Deploy, and remember to destroy
The checked-in manifests from before contain a placeholder registry in us-central1. Render them through Kustomize and replace the complete image prefix in the stream, leaving source files unchanged:
export REGISTRY=”$(cd infra-gke && terraform output -raw artifact_registry)”

kubectl kustomize k8s/gke \

  | sed “s|us-central1-docker.pkg.dev/<PROJECT_ID>/ocr-repository|${REGISTRY}|g” \

  | kubectl apply -f -
Once deployed, Terraform lets us inspect and reproduce the infrastructure, but it also gives us the most important GPU-cloud command:
terraform destroy
Before running it, delete the Kubernetes resources and PVC so GKE can cleanly remove the dynamically provisioned Filestore instance:
kubectl delete -k k8s/gke --ignore-not-found

kubectl delete job model-weight-ingest --ignore-not-found

kubectl delete pvc model-weights-pvc --ignore-not-found

helm uninstall prometheus --namespace monitoring || true

helm uninstall keda --namespace keda || true

cd infra-gke

terraform plan -destroy -out=destroy.tfplan

terraform apply destroy.tfplan
Do not treat destruction as an afterthought. GPU nodes, CPU pools, Filestore and the GKE control plane can all generate costs. The real benefit of Terraform is not only that we can create this architecture repeatedly: it is that we know exactly what we created and have a repeatable way to remove it when we are finished. Like this we won’t incur in huge cloud-bills without noticing.
Miguel worked on this system for weeks. Running all of this in one go will take ~90min, assuming you know what you're doing.
So grab a cup of coffee, roll your sleeves up, and happy coding!
— Bruno