


This is the applied lab for Lesson 7 of our Finetuning Sessions.
Haven't caught Wednesday's foundations article yet? Go give it a read! We broke down the intuition behind vision and TTS finetuning, walked through the main architectures, and explored why multimodal finetuning is such a big deal.

By the end of this lab, you'll have finetuned two multimodal models with your own hands: a vision model that converts handwritten math into LaTeX, and a TTS model that generates speech in a custom voice.
What You'll Need
Before we start, make sure you have:
A Google account (we'll use free Colab T4 GPUs for both finetuning runs)
A Hugging Face account with a write token (for saving your finetuned models)
Around 1-2 hours of total time (training runs included)
Both notebooks run entirely on free Colab instances (no paid GPUs required for this one).
Handwriting to LaTeX with Qwen3-VL
In this first part, we'll finetune Qwen3-VL (8B) to convert photos of handwritten mathematical formulas into clean LaTeX code.
This is a great example of a vision finetuning task: the base model can describe images in general terms, but it doesn't know how to produce precise LaTeX output from handwritten notation. Finetuning fixes that.
Step 1: Setup & Model Loading
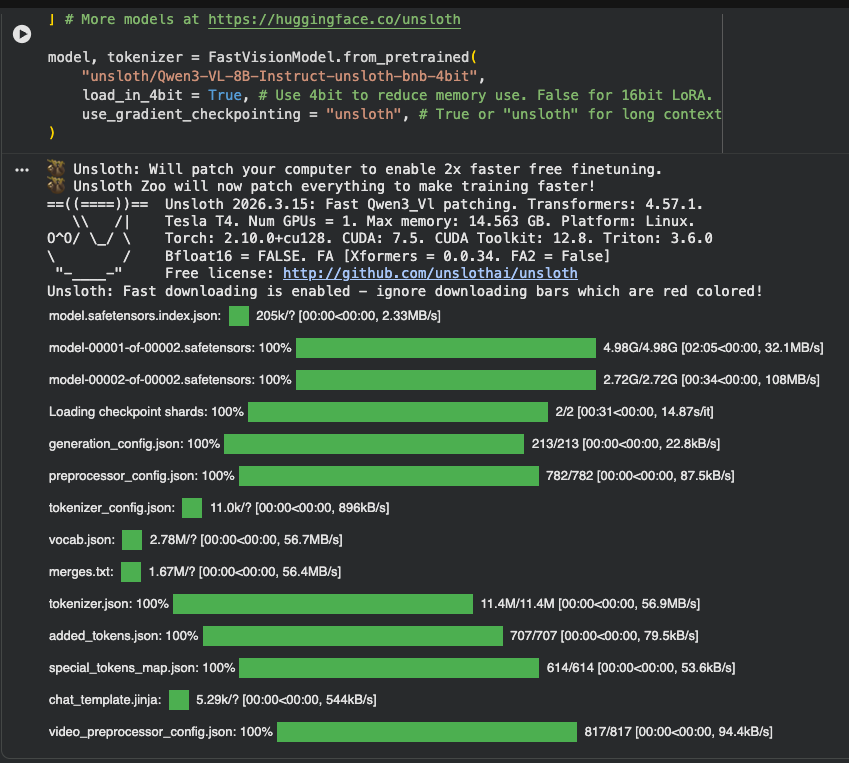
We start by installing Unsloth and loading the Qwen3-VL 8B model in 4-bit quantization. This is the QLoRA setup you already know from previous lessons — the only difference is that we’re using FastVisionModel instead of FastLanguageModel.
from unsloth import FastVisionModel
import torch

model, tokenizer = FastVisionModel.from_pretrained(
    "unsloth/Qwen3-VL-8B-Instruct-unsloth-bnb-4bit",
    load_in_4bit = True,
    use_gradient_checkpointing = "unsloth",
)
Notice anything? It's almost identical to loading a text model. Unsloth handles the vision encoder, the projection layer, and the LLM backbone (all under one call).
Step 2: Adding LoRA Adapters
Here's where it gets interesting. With vision models, Unsloth gives you granular control over what to finetune:
model = FastVisionModel.get_peft_model(
    model,
    finetune_vision_layers     = True,  # Finetune the ViT?
    finetune_language_layers   = True,  # Finetune the LLM?
    finetune_attention_modules = True,  # Finetune attention?
    finetune_mlp_modules       = True,  # Finetune MLP layers?

    r = 16,
    lora_alpha = 16,
    lora_dropout = 0,
    bias = "none",
    random_state = 3407,
    use_rslora = False,
    loftq_config = None,
)
As we discussed in the foundations article, you typically keep the vision encoder frozen. But Unsloth lets you experiment (try setting finetune_vision_layers = False) and see how it affects your results.
For our handwriting task, finetuning both vision and language layers gives the best outcome because the model needs to learn to read a very specific visual style (handwritten math notation).
Step 3: Dataset Preparation
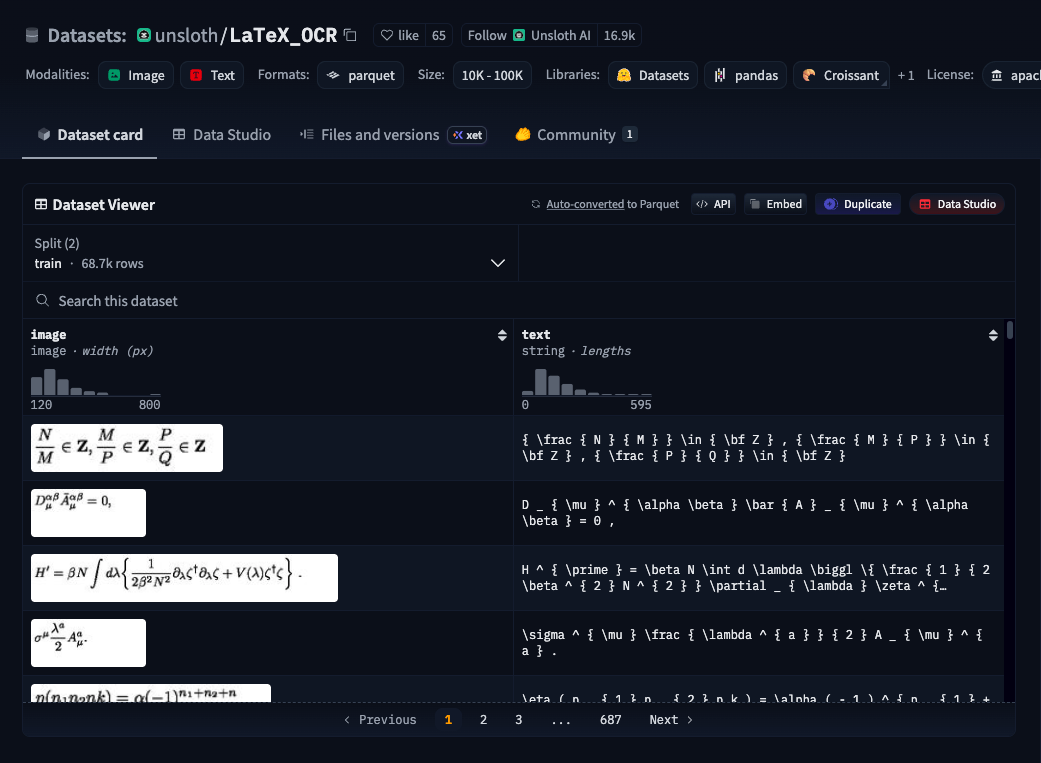
We're using the LaTeX_OCR dataset — a collection of handwritten math formula images paired with their LaTeX representations.
from datasets import load_dataset
dataset = load_dataset("unsloth/LaTeX_OCR", split = "train")
Let’s peek at what we're working with:
The key step is converting each sample into the conversational format that vision models expect:
instruction = "Write the LaTeX representation for this image."

def convert_to_conversation(sample):
    conversation = [
        { "role": "user",
          "content" : [
            {"type" : "text",  "text"  : instruction},
            {"type" : "image", "image" : sample["image"]} ]
        },
        { "role" : "assistant",
          "content" : [
            {"type" : "text",  "text"  : sample["text"]} ]
        },
    ]
    return { "messages" : conversation }

converted_dataset = [convert_to_conversation(sample) for sample in dataset]
This is the standard format for all VLM finetuning: a user message with both text and image, and an assistant response with the expected output. If you've done SFT before, this should feel familiar — the only new element is the {"type": "image"} entry.
Step 4: Before Finetuning — Baseline Check
Before we train anything, let's see what the base model produces:
FastVisionModel.for_inference(model)

image = dataset[2]["image"]
instruction = "Write the LaTeX representation for this image."

messages = [
    {"role": "user", "content": [
        {"type": "image"},
        {"type": "text", "text": instruction}
    ]}
]
input_text = tokenizer.apply_chat_template(messages, add_generation_prompt = True)
inputs = tokenizer(
    image, input_text,
    add_special_tokens = False,
    return_tensors = "pt",
).to("cuda")

_ = model.generate(**inputs, streamer = text_streamer, max_new_tokens = 128,
                   use_cache = True, temperature = 1.5, min_p = 0.1)
As you can see, the base model tries, but it doesn't produce clean, correct LaTeX. That's exactly what finetuning will fix.
Step 5: Training
Time to train! We use SFTTrainer with Unsloth's UnslothVisionDataCollator:
from unsloth.trainer import UnslothVisionDataCollator
from trl import SFTTrainer, SFTConfig

FastVisionModel.for_training(model)

trainer = SFTTrainer(
    model = model,
    tokenizer = tokenizer,
    data_collator = UnslothVisionDataCollator(model, tokenizer),
    train_dataset = converted_dataset,
    args = SFTConfig(
        per_device_train_batch_size = 2,
        gradient_accumulation_steps = 4,
        warmup_steps = 5,
        max_steps = 30,  # Use num_train_epochs = 1 for a full run
        learning_rate = 2e-4,
        logging_steps = 1,
        optim = "adamw_8bit",
        weight_decay = 0.001,
        lr_scheduler_type = "linear",
        seed = 3407,
        output_dir = "outputs",
        report_to = "none",
        # Required for vision finetuning:
        remove_unused_columns = False,
        dataset_text_field = "",
        dataset_kwargs = {"skip_prepare_dataset": True},
        max_length = 2048,
    ),
)

trainer_stats = trainer.train()
A few things to note:
max_steps = 30is just for the demo. For a real finetuning run, setnum_train_epochs = 1and removemax_steps.The three extra
SFTConfigfields at the bottom (remove_unused_columns,dataset_text_field,dataset_kwargs) are required for vision finetuning — don’t skip them.On a free T4, this takes about 5 minutes for 30 steps.
Step 6: After Finetuning — The Difference
Now let's run inference again on the same image:
The model now produces precise LaTeX that, when rendered, matches the handwritten input. That's the power of vision finetuning with just 30 training steps.
Step 7: Saving Your Model
Save the LoRA adapters locally or push them to Hugging Face:
model.save_pretrained("qwen_lora")
tokenizer.save_pretrained("qwen_lora")

# Or push to Hugging Face:
# model.push_to_hub("your_name/qwen_lora", token = "YOUR_HF_TOKEN")
# tokenizer.push_to_hub("your_name/qwen_lora", token = "YOUR_HF_TOKEN")
You can also export to GGUF for local deployment with llama.cpp or Ollama:
# Save to q4_k_m GGUF
model.save_pretrained_gguf("qwen_finetune", tokenizer, quantization_method = "q4_k_m")
Voice Cloning with Orpheus-TTS
Now let's switch modalities entirely. In this second part, we'll finetune Orpheus-TTS (3B) to generate speech in a specific voice. The base model ships with generic preset voices — finetuning will teach it a new one.
Step 1: Setup & Model Loading
This time we’re back to FastLanguageModel — remember, Orpheus is just a Llama 3B under the hood:
from unsloth import FastLanguageModel
import torch

model, tokenizer = FastLanguageModel.from_pretrained(
    model_name = "unsloth/orpheus-3b-0.1-ft",
    max_seq_length = 2048,
    dtype = None,
    load_in_4bit = False,
)
Note that we’re loading in full precision here (load_in_4bit = False). TTS models are more sensitive to quantization than text models — the audio quality can degrade noticeably with 4-bit. If you’re tight on VRAM, you can try True, but expect some quality loss.
Step 2: Adding LoRA Adapters
Standard LoRA setup, targeting all the usual attention and MLP projections:
model = FastLanguageModel.get_peft_model(
    model,
    r = 64,
    target_modules = ["q_proj", "k_proj", "v_proj", "o_proj",
                      "gate_proj", "up_proj", "down_proj"],
    lora_alpha = 64,
    lora_dropout = 0,
    bias = "none",
    use_gradient_checkpointing = "unsloth",
    random_state = 3407,
)
Notice the r = 64 — higher than the r = 16 we used for vision. TTS finetuning benefits from a higher rank because the model needs to learn subtle acoustic patterns (voice timbre, pacing, intonation) that require more expressive capacity in the adapters.
Step 3: Dataset & Audio Tokenization
This is where TTS finetuning diverges the most from text finetuning. We're using the MrDragonFox/Elise dataset — a single-speaker voice dataset designed for TTS training.
from datasets import load_dataset
dataset = load_dataset("MrDragonFox/Elise", split = "train")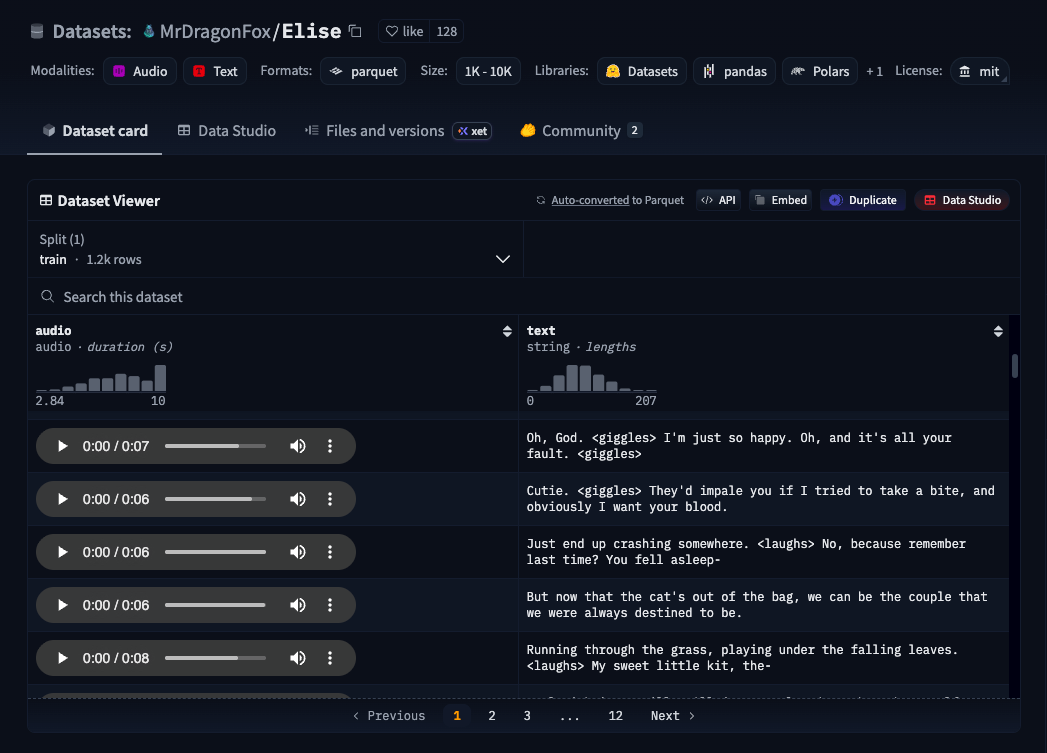
Now comes the critical step: encoding the audio into SNAC tokens. As we explained in the foundations article, the LLM doesn't work with raw audio — it works with discrete audio tokens produced by the SNAC codec.
from snac import SNAC
import torchaudio.transforms as T

snac_model = SNAC.from_pretrained("hubertsiuzdak/snac_24khz")
snac_model = snac_model.to("cuda")

def tokenise_audio(waveform):
    waveform = torch.from_numpy(waveform).unsqueeze(0)
    waveform = waveform.to(dtype=torch.float32)
    resample_transform = T.Resample(orig_freq=ds_sample_rate, new_freq=24000)
    waveform = resample_transform(waveform)
    waveform = waveform.unsqueeze(0).to("cuda")

    with torch.inference_mode():
        codes = snac_model.encode(waveform)

    all_codes = []
    for i in range(codes[0].shape[1]):
        all_codes.append(codes[0][0][i].item() + 128266)
        all_codes.append(codes[1][0][2*i].item() + 128266 + 4096)
        all_codes.append(codes[2][0][4*i].item() + 128266 + (2*4096))
        all_codes.append(codes[2][0][(4*i)+1].item() + 128266 + (3*4096))
        all_codes.append(codes[1][0][(2*i)+1].item() + 128266 + (4*4096))
        all_codes.append(codes[2][0][(4*i)+2].item() + 128266 + (5*4096))
        all_codes.append(codes[2][0][(4*i)+3].item() + 128266 + (6*4096))

    return all_codes
Let’s unpack what's happening here, because this is the core of TTS data preparation:
Resample to 24kHz — SNAC expects 24kHz audio, so we resample from whatever the dataset provides.
Encode with SNAC — This produces three layers of codes at different temporal resolutions (12Hz, 24Hz, 48Hz).
Interleave into a flat sequence — The 7-token-per-frame pattern we discussed in the foundations article. Each frame contains 1 coarse + 2 mid + 4 fine tokens.
Offset by 128,266 — This shifts the audio token IDs into a range that doesn't collide with the LLM's text vocabulary. Each layer gets an additional offset of
n × 4096so the model can distinguish which layer each token belongs to.
We then apply this to the entire dataset:
dataset = dataset.map(add_codes, remove_columns=["audio"])
dataset = dataset.filter(lambda x: x["codes_list"] is not None)
dataset = dataset.filter(lambda x: len(x["codes_list"]) > 0)
Step 4: Formatting the Training Data
Each training sample is structured as a sequence of special tokens:
def create_input_ids(example):
    text_prompt = example["text"]
    text_ids = tokenizer.encode(text_prompt, add_special_tokens=True)
    text_ids.append(end_of_text)

    input_ids = (
        [start_of_human]
        + text_ids
        + [end_of_human]
        + [start_of_ai]
        + [start_of_speech]
        + example["codes_list"]
        + [end_of_speech]
        + [end_of_ai]
    )
    example["input_ids"] = input_ids
    example["labels"] = input_ids
    example["attention_mask"] = [1] * len(input_ids)
    return example
The structure is: [SOH] text tokens [EOH] [SOA] [SOS] audio tokens [EOS] [EOA]. The model learns to predict the audio tokens given the text — which is exactly the “speech as a language” paradigm we covered in the foundations.
There's also a deduplication step that removes consecutive frames with the same coarse token — this cleans up silent or repetitive sections:
def remove_duplicate_frames(example):
    vals = example["codes_list"]
    result = vals[:7]
    for i in range(7, len(vals), 7):
        current_first = vals[i]
        previous_first = result[-7]
        if current_first != previous_first:
            result.extend(vals[i:i+7])
    example["codes_list"] = result
    return example
Step 5: Training
The training loop uses the standard Hugging Face Trainer (not SFTTrainer — since we’ve already formatted the input_ids manually):
from transformers import TrainingArguments, Trainer

trainer = Trainer(
    model = model,
    train_dataset = dataset,
    args = TrainingArguments(
        per_device_train_batch_size = 1,
        gradient_accumulation_steps = 4,
        warmup_steps = 5,
        max_steps = 60,  # Use num_train_epochs = 1 for a full run
        learning_rate = 2e-4,
        logging_steps = 1,
        optim = "adamw_8bit",
        weight_decay = 0.001,
        lr_scheduler_type = "linear",
        seed = 3407,
        output_dir = "outputs",
        report_to = "none",
    ),
)

trainer_stats = trainer.train()
A few differences from the vision training:
per_device_train_batch_size = 1— TTS sequences can be long (hundreds of audio tokens per sample), so we keep the batch size small.max_steps = 60— We use more steps than the vision example because audio patterns take longer to learn.We use the standard
Trainerinstead ofSFTTrainersince the data is already tokenized.
Step 6: Inference — Hearing the Results
This is the most satisfying part. Let's generate speech with our finetuned model:
FastLanguageModel.for_inference(model)
snac_model.to("cpu")  # Free up GPU for generation

prompts = [
    "Hey there my name is Elise, <giggles> and I'm a speech generation model that can sound like a person.",
]
The inference pipeline is:
Tokenize the text prompt with special control tokens
Generate audio token IDs with the LLM
Decode those token IDs back into a waveform with SNAC
Play the audio!
Notice how the finetuned model picks up the <giggles> tag and produces a more natural, expressive delivery.
The base model's preset voices are decent, but the finetuned voice captures the specific characteristics of the Elise dataset — the pacing, the warmth, the small vocal quirks.
Step 7: Saving Your Model
Same as before — save the LoRA adapters or merge and push:
model.save_pretrained("orpheus_lora")
tokenizer.save_pretrained("orpheus_lora")

# Or push to Hugging Face:
# model.push_to_hub("your_name/orpheus_lora", token = "YOUR_HF_TOKEN")
For TTS, you'll likely want the merged 16-bit version for deployment, since inference quality matters more than model size:
# Merge to 16bit for best audio quality
model.save_pretrained_merged("orpheus_finetune_16bit", tokenizer, save_method = "merged_16bit")
Wrapping Up
Let's step back and appreciate what we just did:
We finetuned a vision model (Qwen3-VL, 8B parameters) to convert handwritten math into LaTeX — using the exact same LoRA + SFT workflow we've used all course
We finetuned a TTS model (Orpheus, 3B parameters) to generate speech in a custom voice — again, same LoRA workflow, just with audio tokens instead of text tokens
Both ran on free Colab GPUs
The total code difference between finetuning a text model, a vision model, and a TTS model? Maybe 20 lines
That's the message of this lesson: multimodal finetuning is not a new skill. It's the same skill, applied to new modalities. The encoders and decoders change, but the core — LoRA adapters on a transformer backbone, trained with SFT — stays the same.
Now go build something with it. And if you do, tell us about it in the comments (we'd love to see what you create! 🚀
Resources
Notebooks used in this lab:
Datasets:
Models:
Documentation: