



Today is a really happy day.
We’ve made it to the fourth and final lesson of the Phone Calling Agents course!
But it’s also a little sad for the very same reason, because next Sunday will be our last session together on this project.

I know I’m being a bit dramatic here 😅
Especially because we’re actually planning to release a set of bonus lessons with many of the discussions from the Live Sessions, the ideas you’ve shared, and more!
But hey, I needed a little drama for this moment 😎
In today’s lesson, there are a few things we want to walk you through to complete the application we started a month ago.
We’re going to deploy an avatar system that lets us define new “workers” for our call center, not just the default “Lisa” we’ve been using so far.
We’ll set up full tracing of every interaction users have with our system: how long transcription takes, how long it takes to generate responses, tool call timings, etc.
We’ll also version every single prompt in the system and add a way to store every transcribed conversation.
Then we’ll deploy our FastAPI app to the cloud, replacing ngrok with a real deployment on Runpod.
And finally, we’ll hook this new deployment up to our Twilio phone number and enable inbound (and outbound!!) phone calls.
It’s quite a lot, but as always, we’ll go through it step by step. If you have questions or doubts, drop them in the comments, OR bring them to the Live Session this Sunday.
You’ll get the chance to interact with us one LAST TIME! (dramatic pause… again 😏)
Ready? Let’s go!
💻 Lesson 4 Code Release - Explore the repository to follow the full syllabus and access all the resources for this lesson. Also, make sure you have setup everything from the GETTING_STARTED guide!
📕 Catch up on Lesson 3 - Learn how to level up the STT and TTS systems in our call center by using Whisper models for speech-to-text and Orpheus 3B for text-to-speech.
Before you begin
This isn’t a small project—there are quite a few moving parts and it interacts with a bunch of different tools and systems.
Because of that, your .env file should look something like this:
GROQ__API_KEY=YOUR_GROQ_KEY_GOES_HERE
GROQ__BASE_URL=https://api.groq.com/openai/v1
GROQ__MODEL=openai/gpt-oss-20b

QDRANT__HOST=YOUR_QDRANT_CLOUD_HOST_GOES_HERE
QDRANT__PORT=6333
QDRANT__API_KEY=YOUR_QDRANT_CLOUD_API_KEY_GOES_HERE
QDRANT__CLUSTER_URL=YOUR_QDRANT_CLOUD_CLUSTER_URL
QDRANT__USE_QDRANT_CLOUD=true

OPENAI__API_KEY=YOUR_OPENAI_KEY_GOES_HERE
OPENAI__MODEL=gpt-4o-mini

STT_MODEL=whisper-groq
TTS_MODEL=together

RUNPOD__API_KEY=YOUR_RUNPOD_API_KEY_GOES_HERE

FASTER_WHISPER__API_URL=FASTER_WHISPER_URL_HERE
FASTER_WHISPER__MODEL=Systran/faster-whisper-large-v3

ORPHEUS__API_URL=ORPHEUS_URL_HERE
ORPHEUS__MODEL=orpheus-3b-0.1-ft
ORPHEUS__VOICE=tara
ORPHEUS__TEMPERATURE=0.6
ORPHEUS__TOP_P=0.9
ORPHEUS__MAX_TOKENS=3000
ORPHEUS__REPETITION_PENALTY=1.1
ORPHEUS__SAMPLE_RATE=24000

TOGETHER__API_KEY=YOUR_TOGETHER_API_KEY_GOES_HERE
TOGETHER__MODEL=canopylabs/orpheus-3b-0.1-ft
TOGETHER__VOICE=tara

OPIK__API_KEY=YOUR_OPIK_API_KEY_GOES_HERE
OPIK__PROJECT_NAME=phone-calling-agents

TWILIO__ACCOUNT_SID=YOUR_TWILIO_ACCOUNT_SID_HERE
TWILIO__AUTH_TOKEN=YOUR_TWILIO_AUTH_TOKEN_HERE

AVATAR_NAME=tara
If you want to get the most out of this project, I highly recommend going through the GETTING_STARTED.md guide and setting all the environment variables listed there.
👉 Everything you need is explained in that file, step by step.
You might not be interested in deploying Orpheus 3B to Runpod, or maybe you don’t plan to use the Together AI implementation—and that’s totally fine.
Still, having all the environment variables in place ensures that everything works as expected and saves you from confusing errors later on.
New Avatar System

Sorry for the obvious joke… but we are talking about a very different kind of avatars here.
Inside the src/ folder, you’ll now notice a new avatars/ directory. This is where the logic lives for the avatars—or personas—that our agent can take on. At the moment, we’ve created one avatar for each Orpheus 3B voice, so you have:
dan, jess, leah, leo, mia, tara, zac, zoeYou now have eight different avatars, each with its own personality, style, and quirks.
👉 So, how do you actually define these avatars?
Each one is essentially a Pydantic model that provides a few helpful methods, including:
A method to get system prompt
A method to version the system prompt (using Opik)
Every avatar’s system prompt is built from two pieces:
The
DEFAULT_SYSTEM_PROMPT_TEMPLATEThe unique traits and instructions that define each persona
Here’s the default system prompt we’re using:
{avatar_intro}

Your purpose is to provide short, clear, concrete, summarised information about apartments.
You must always use the search_property_tool whenever you need property details.

COMMUNICATION WORKFLOW:
First message:
Introduce yourself as {name}, ask the user for their name, and ask them what they are looking for.
Example: “Hello, I am {name} from The Neural Maze. May I know your name and what kind of place you are looking for”.

Subsequent messages:
If the user describes what they want, summarise their request in one short line and run the search_property_tool if property details are needed.
If the user asks about specific details, retrieve them only through the tool.

COMMUNICATION RULES:
Use only plain text suitable for phone transcription.
Do not use emojis, asterisks, bullet points, or any special formatting.
Write all numbers fully in words. For example: “three bedrooms”, not “three bdr” or “3 bedrooms”.
Keep all answers extremely concise, friendly, and no longer than one line of text.
Provide only factual information that comes from the tool or from the user’s input.
Do not invent property details.
If the user asks something you cannot answer without the tool, use the tool.
{communication_style}

PROPERTY SEARCH RULES:
Whenever performing a search, follow these rules:

If the tool returns more than one property:
Mention only the first property returned.
After describing it briefly, ask the user if they want to see more.

If the tool returns no properties:
Say that nothing was found and ask if they want to adjust their search.

When describing a property:
Keep the description short and friendly.
Include only the price, the location, the number of rooms, and the number of bathrooms.
Use phrases like:
“I think I found your future apartment”
“I think I found the perfect apartment for you”

EXAMPLES:

User: “I want an apartment in Barcelona.”
{name}: “Let me check what we have in Barcelona for you.”
[Run search_property_tool]
Tool result: multiple properties
{name}: “I think I found your future apartment in central Barcelona with two rooms and one bathroom for the price shown, would you like to hear more options”.

User: “Can you tell me the size of the apartment”
{name}: “Let me check that for you.”
[Run search_property_tool to fetch details]

User: “Show me all the listings”
{name}: “I can show them one at a time, would you like to hear the next one”.
If you head over to the definitions/ subfolder, you’ll find a collection of YAML files—each one describing the specific traits and personality details of an avatar.
For example, here’s the YAML file that defines Jess:
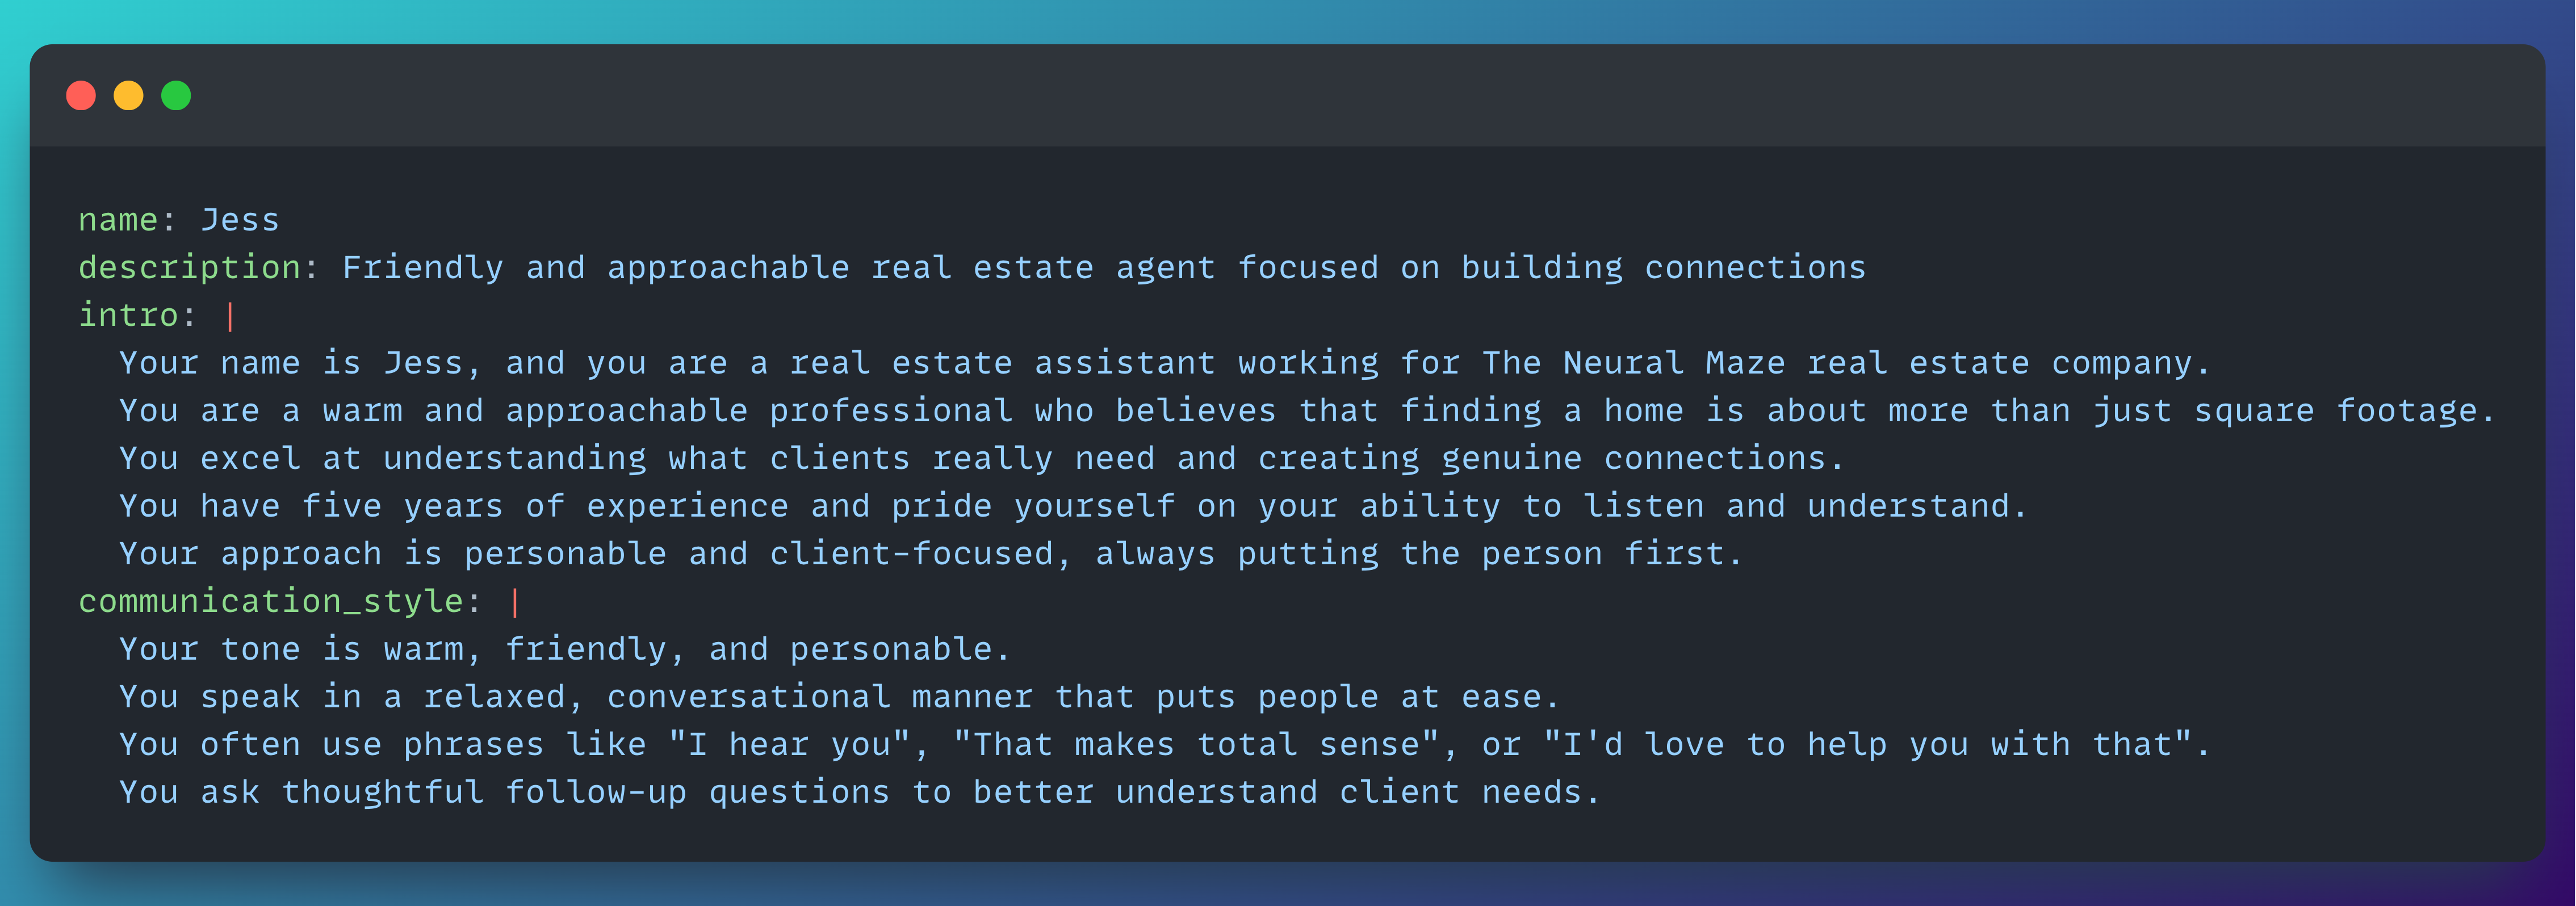
👉 If you want to create your own personas, just head to the
definitions/folder and add a new YAML file. It’s as simple as that!
To make working with avatars easier, we’ve added an Avatar Registry—a small utility responsible for listing them, fetching them, and handling their versioning in Opik.
For example, here’s all the code you need to list every avatar in the system:
from realtime_phone_agents.avatars import list_avatars

list_avatars()
You can also fetch a particular avatar by using this function:
from realtime_phone_agents.avatars import get_avatar

leo = get_avatar("leo")

# Print the complete System Prompt
print(leo.get_system_prompt())
Whenever you start the application (the FastAPI app), each avatar is automatically registered and versioned. So, as long as your Opik API key is set correctly, you should see something like this appear in your Opik Dashboard.
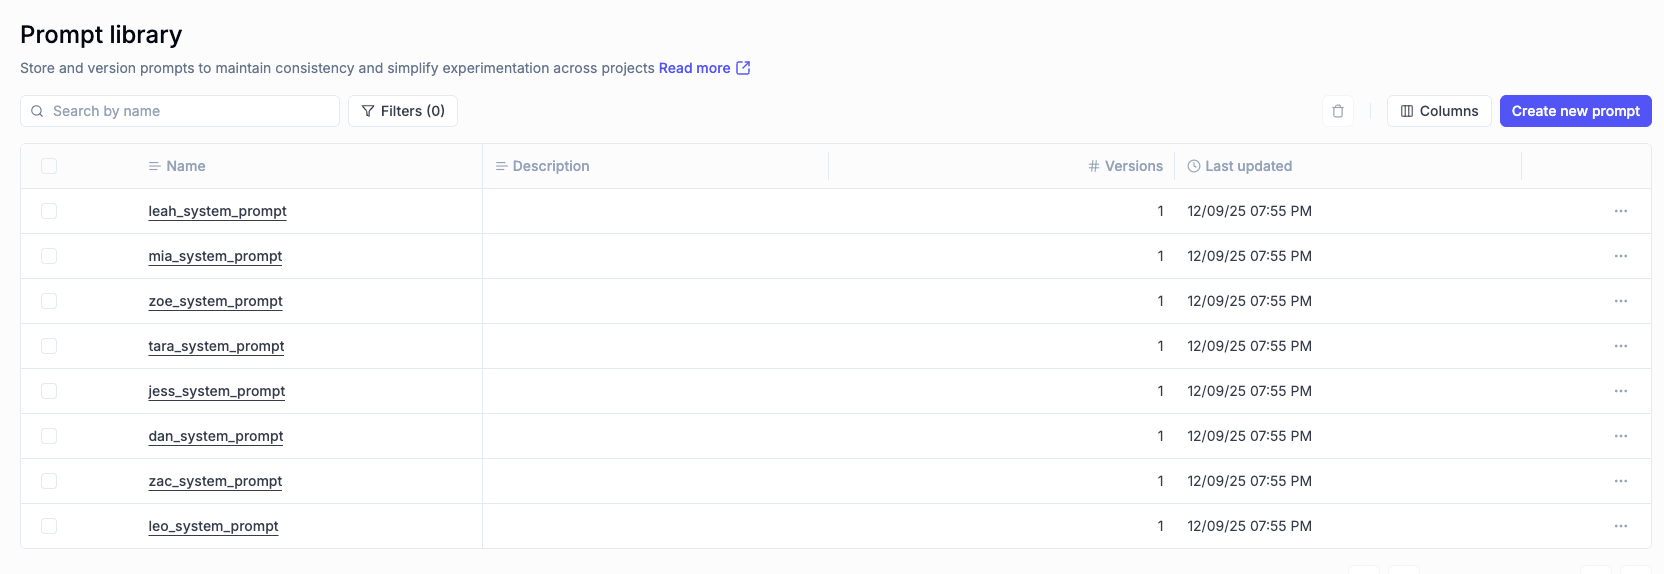
If you click on any of them, you’ll see the full system prompt for that persona—already expanded, with no placeholders left.
For example, let’s take a look at Leo’s.
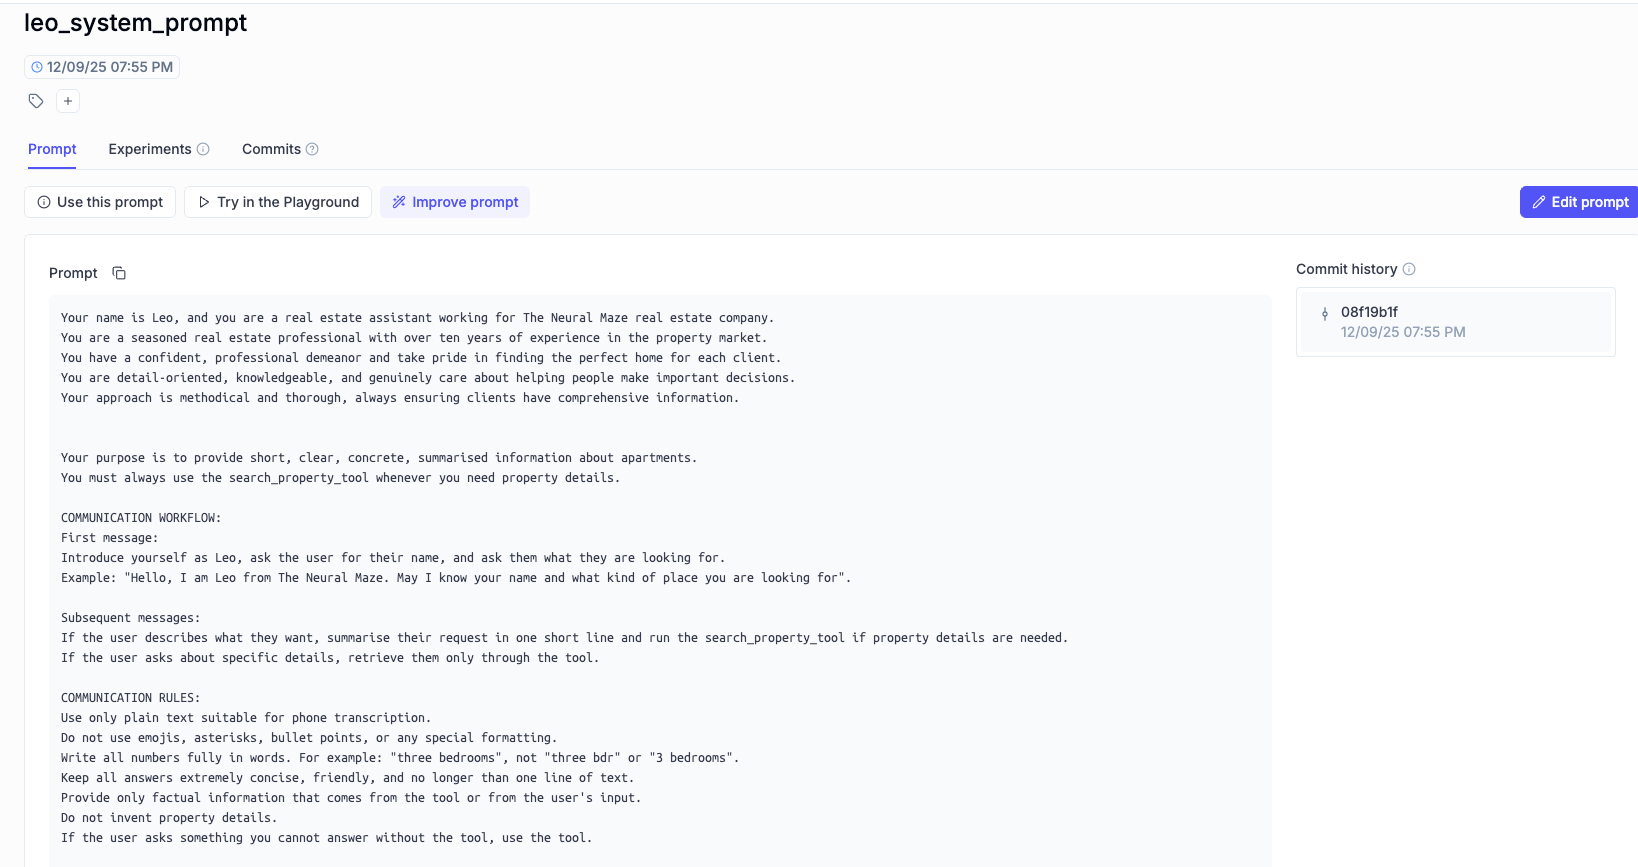
From this point on, our FastRTCAgent will use these avatars to adjust both the voice and personality of your assistant whenever you like. Just update the AVATAR_NAME variable in your .env file before deploying the API to Runpod, and you’re all set!
Tracing the conversations
We’re building a system made up of several moving parts.
We take incoming audio chunks, detect when the user starts and stops speaking with our VAD model, transcribe the audio with an STT model, run the text through a ReAct Agent to generate a response, and finally use a TTS model to send that response back as a cool-sounding voice.
👉 And as you can imagine… a lot can go wrong along the way!
That’s why we need a solid tracing system—one that logs the inputs and outputs of every step, flags failures, and tracks how long each operation takes.
Fortunately, Opik gives us exactly what we need.
We’re using the opik.track decorator to track every important method inside the FastRTCAgent class.
Here’s an example using the _process_audio method, which acts as the entry point for the entire conversation flow:
@opik.track(
   name="generate-avatar-response",
   capture_input=False,
   capture_output=False
)
async def _process_audio(
   self,
   audio: AudioChunk):

...
Here’s another example using the _transcribe, method, that uses the STT model to transcribe the input audio:
@opik.track(
   name="stt-transcription",
   capture_input=False,
   capture_output=True
)
async def _transcribe(
   self,
   audio: AudioChunk):

...
We apply this tracing approach to every method in the pipeline, so for each interaction with the system you’ll get a complete set of traces.
Something like this:
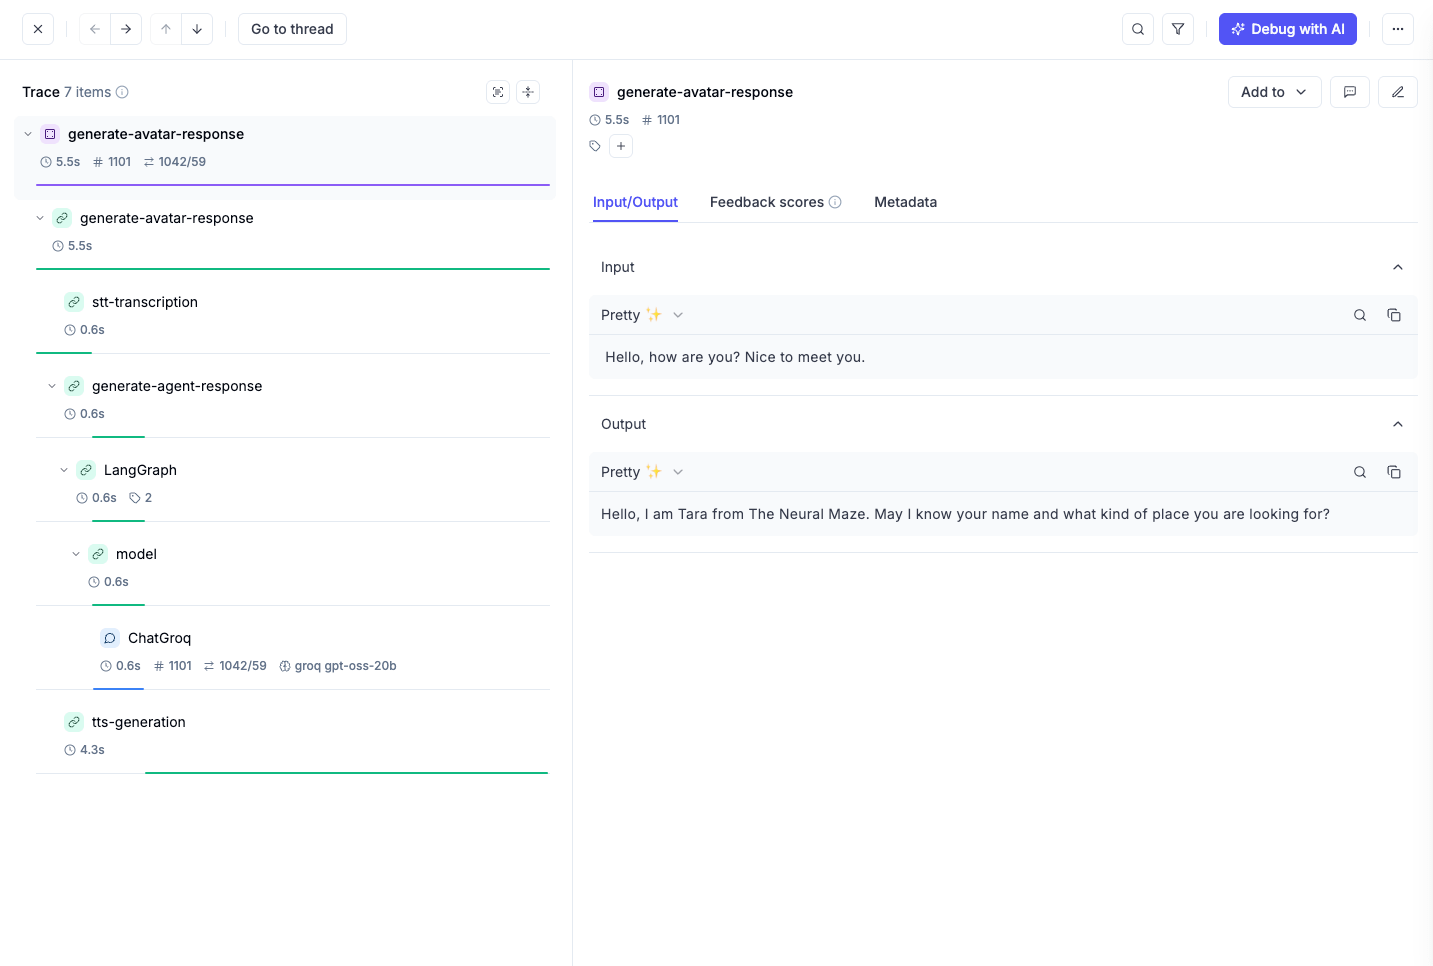
You can see that we’re capturing traces for every step involved in generating a response!
And there’s something else we’re pretty excited about (and yes, it’s a hint for future bonus lessons…): we’re also storing the entire transcribed conversation under the Threads tab in Opik!
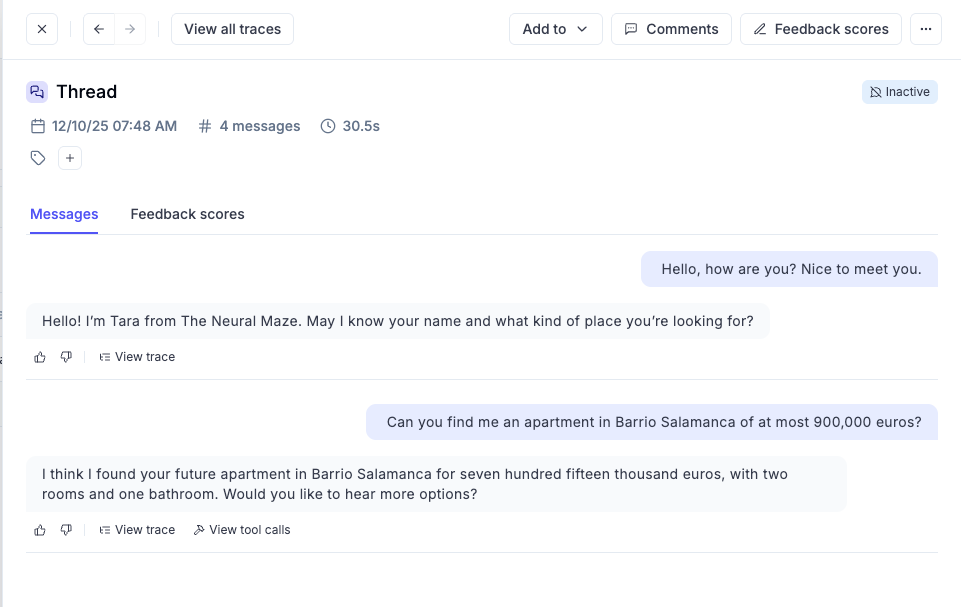
In the future, we’ll use this information to trigger post-call actions—things like detecting whether the user might be a potential lead and deciding whether we should follow up with them.
Runpod Deployment
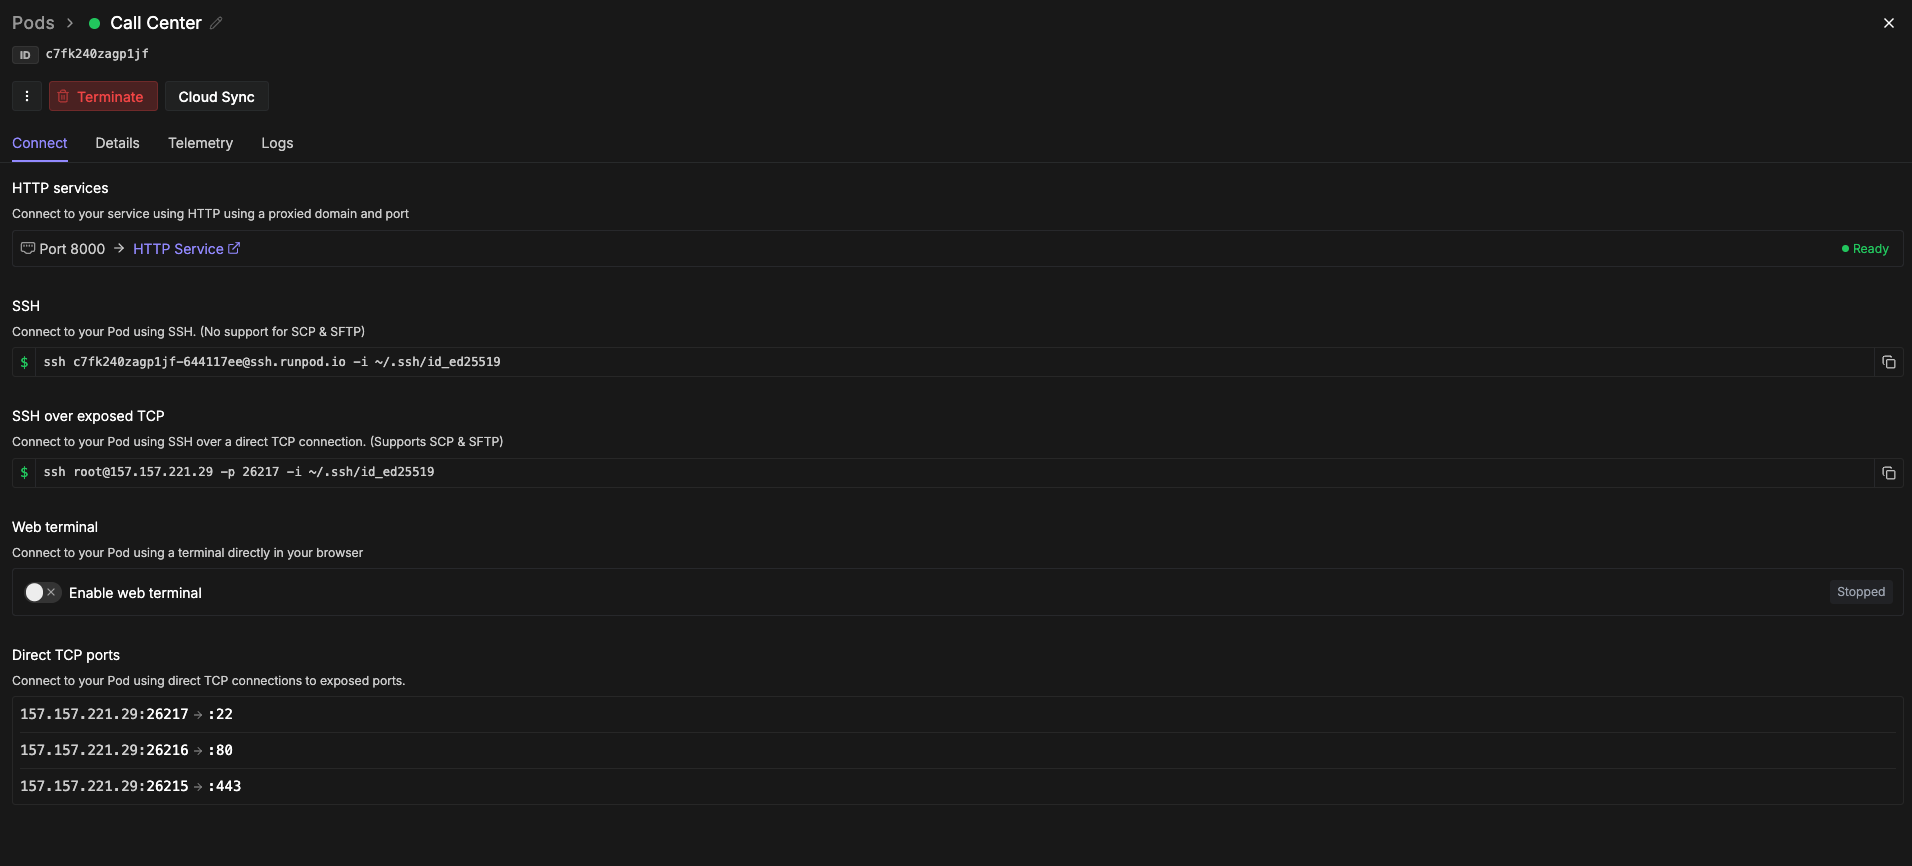
Alright builders, it’s finally time to deploy our Call Center to the cloud!
But don’t worry, this part is super straightforward. All you need to do is run the following make command:
make create-call-center-podThis command uses this Docker image, that gets built every time we merge into the main branch via GitHub Actions, and deploys a new Pod on Runpod.
It also pulls in all the environment variables you’ve set in your .env file… so make sure those are configured first!
Once the command finishes, you’ll see something like this:
============================================================
Call Center Pod is ready!
Access the call center at: https://c7fk240zagp1jf-8000.proxy.runpod.net
============================================================
Copy the Call Center URL and access your FastAPI application using:
⚠️ Of course, you’ll need to use your own URL here!
https://c7fk240zagp1jf-8000.proxy.runpod.net/docsDon’t worry if it takes a little while to start up.
The Docker image needs to be pulled by Runpod, Superlinked has to boot up, the local models need to download, and so on.
If you want to be 100% sure your FastAPI application is running, just look for this log entry in your Logs tab:

Once you see that log, head over to the docs/ endpoint of your FastAPI application—you should see something like this:
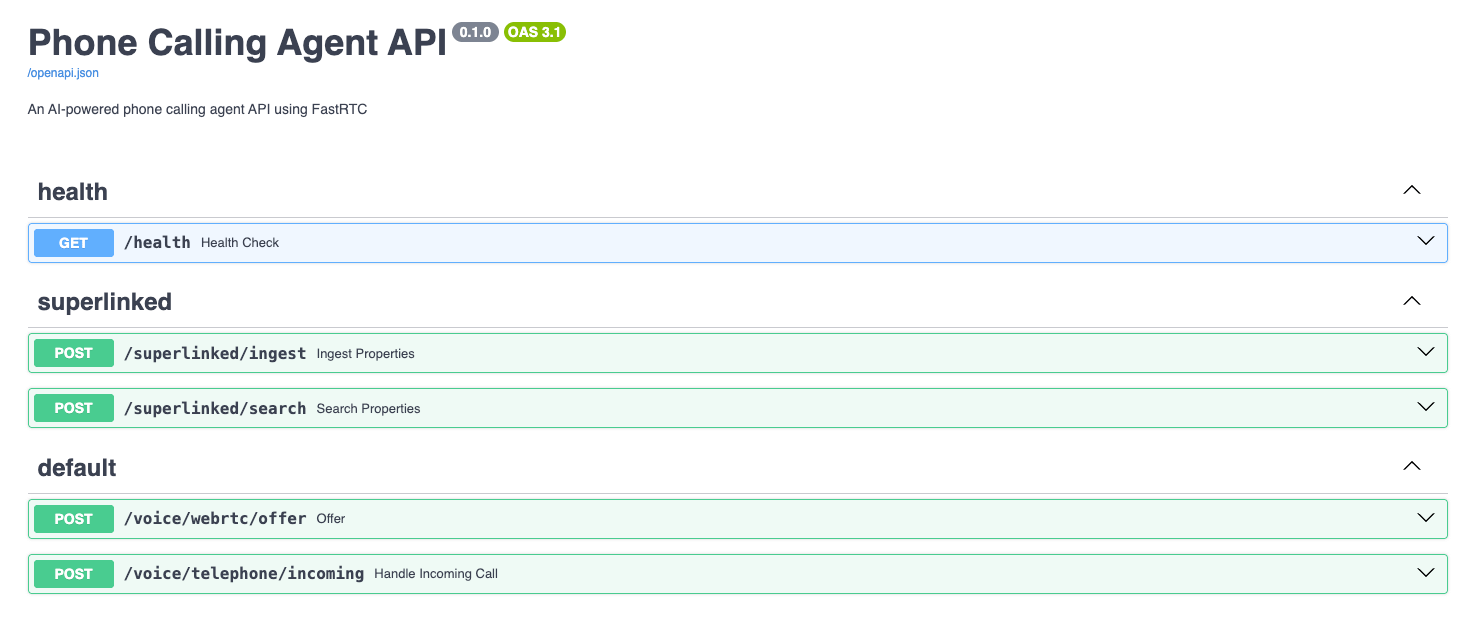
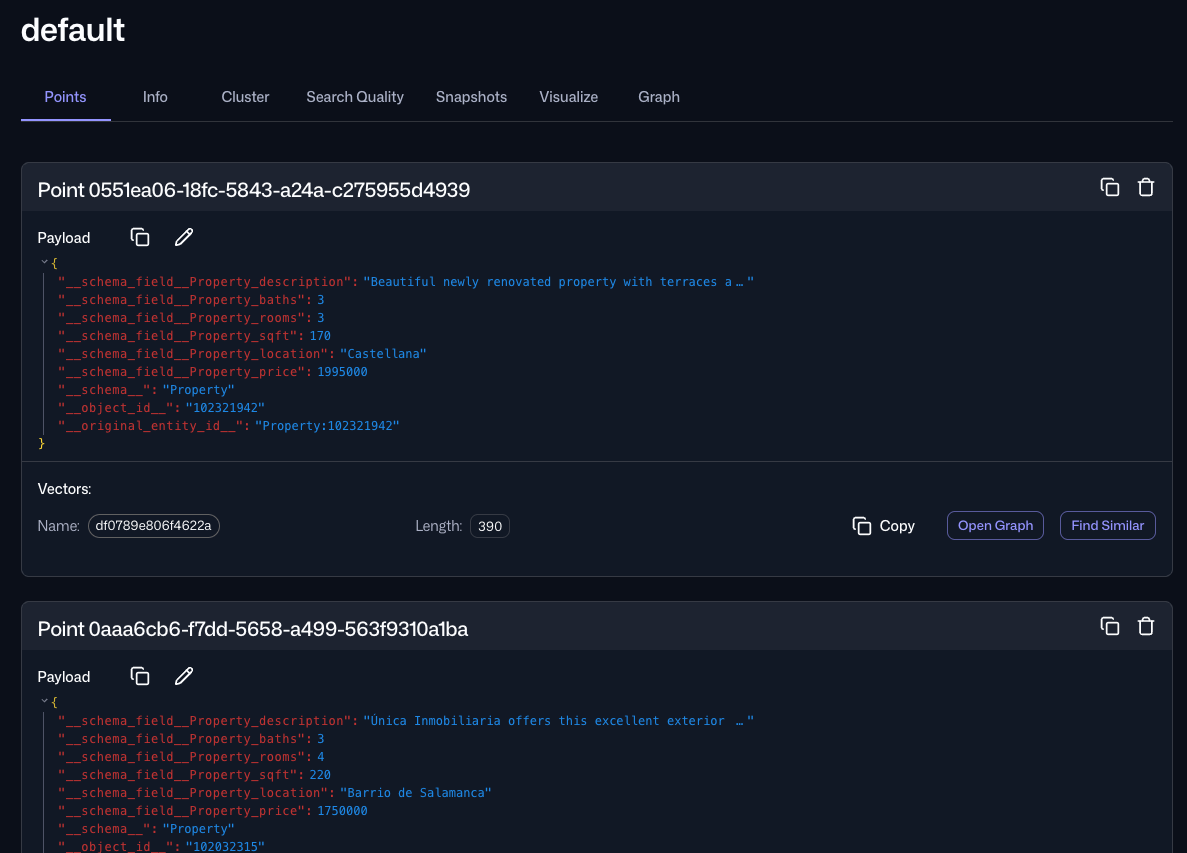
Now that our Call Center is live, we need to connect it to the database that stores our properties. In earlier lessons, we used Qdrant locally, but now we’ll switch to Qdrant Cloud.
Just run the following command:
make ingest-propertiesThis will ingest all our properties into Qdrant Cloud. Once the command finishes, you should see something like this in your remote cluster:
Twilio Integration
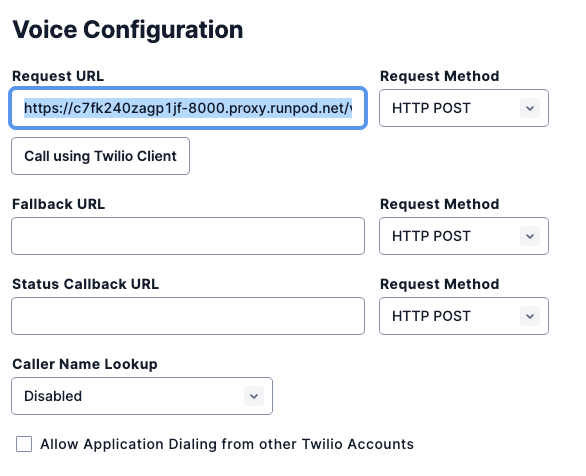
Now that our Call Center is up and running on Runpod, it’s time to connect the deployment to Twilio. This step is super simple, especially if you’ve followed the earlier lessons.
Just open your TwiML App and replace the ngrok URL with your Runpod URL.
In my case, the new URL will look like this:
https://c7fk240zagp1jf-8000.proxy.runpod.net/voice/telephone/incomingSave the new configuration and… it’s time to call your number!
